Profile Prism
Procedure for profiling a scanner
Topics of Interest
Using Profile Prism Software
Quick start instructions for profiling a
scanner:
Note that scanning software varies greatly
from one manufacturer to another. While the quick start
instructions below describe the overall process of creating a
scanner profile along with some recommended settings, we
recommend reading and being familiar with the detailed
instructions in the following section as well.
- Place IT8 target on scanner glass.
- Place piece of black construction
paper on top.
- Close scanner lid.
- Open scanning software set software
settings as recommended here.
- Scan the target and make sure target
is not rotated in the scanned image.
- Bring image into Profile Prism and
place four corner markers.
- Evaluate the messages to determine
exposure, lighting, etc.
- Repeat 6-10 to correct any warnings.
- After placing four corner markers, set
PP options as follows:
- Type of device to profile:
camera/scanner
- Reference target:
same as that shown on lower/right of ref.
target
- Profile description:
scanner model and other info as desired
- File name: click
"..." and select a name for the ICC
profile
- Profile for: highest
accuracy
- White balance: allow
profile to fix WB
- Tone reprod. curves:
do not normalize
- Manual adjustments:
all "normal" or zero
- Click "Create Profile"
Note: When scanning normal photos and using
the profile developed above, it is important to scan photos
using steps 1-5 above so that your photos are scanned under
the same conditions as those used to create the profile.
The following describes the process for
creating an ICC profile for a scanner using Profile Prism:
I.
Acquiring the Image(s)
Before we use the software to create an ICC
profile, we must do what we can to ensure that a quality
image of the reference target is acquired. In this step, we
must scan the IT8 reference target with the best settings
possible. The reference target has 288 separate color patches
that cover a wide range of colors. The object here is to
acquire an image of this target with your scanner.
- Scanner preparation:
clean the scanner glass with glass cleaner to ensure
a quality scan. For best results, we recommend
scanning with a black background. If your scanner has
a white background on the underside of the scanner
lid, cut a piece of black construction paper to the
size of the scanner glass. You will use this paper in
the next step.
- Target preparation:
Place the reference target face down on the scanner
glass and flush against the edge/top to ensure good
alignment. Place the black piece of construction
paper (cut in step 1) on top and close the lid.
- Scanning software:
Open your scanning software and set scanning
settings as recommended for your scanner.
- Scanning: To ensure
that the scanner is fully warmed up, we recommend
scanning the reference target twice
and saving the second scan (discard the first scan).
We have found that many scanners (especially Epson
scanners) overexpose the first scan in a sequence if
the scanner lamp was off prior to the scan sequence.
II. Using the Software
Step 1: Specify profile
details
Before telling Profile Prism to generate
your ICC profile, you need to specify a name, description and
some options. Below is a description of each entry.
- Type of Device to Profile:
Since we are profiling a scanner in this section,
select "Camera/Scanner" for this setting.
- Profile Description:
Enter a description for the profile such as "Acme
800 scanner profile".
- File Name: To save
your profile to the system color folder (c:\windows\system\color
for example), click the "..." browse button
and enter a new file name in the "Save As"
dialog or select an existing profile to overwrite.
You may also type a file name directly into the edit
box if you like, however, if a file name is typed
without specifying a path, the profile will be saved
in the folder where Profile Prism is installed. For
example, entering "test" in the file name
field will result in a profile named "test.icm"
being stored in your \program files\prism folder.
- Profile For: Profile
Prism can create very accurate profiles, however,
since some scanners can be inaccurate in very narrow
bands of the color spectrum, profiles for these
scanners can make images look noisy. This is due to
the fact that you are taking a very narrow band of
color and expanding it to have wider "separation".
In doing so, shadow/background noise may be enhanced.
Generally the more expensive scanners can be used in
"Highest Accuracy" mode. If you find that
your profiles create noisy images or images that have
posterization artifacts, however, you may need to
switch to "Smoother Gradients". The "Smoother
Gradients" method sacrifices a (small) amount of
accuracy to ensure that there are no large color
variations. If you are unsure, always start with
"Higher Accuracy" and only use "Smoother
Gradients" if you have a problem with image
noise.
- Tone Reproduction Curve:
If you are profiling a camera or scanner, you may select from the
following choices for how Profile Prism generates the tone curve for
your profile:
- Normalize: The Normalize option is the default
selection and should be used whenever you want to reproduce accurate
(linear) tonality on a device like a camera or scanner set to automatic
settings. On such devices, exposure is relative and often changes
from one capture to the next, so normalizing the tone reproduction
curves will adjust for any slight deviation in exposure of the test
target in order to create curves that will work well with any shot
regardless of how it is exposed. Note that when profiling some
devices, particularly cameras where tonality may be dependent on the
scene, it is not always desirable to produce linear tone curves as they
may often appear "dull" due to reduced contrast. If you would like
your profile to correct hue errors without affecting tonality
(brightness or contrast), see the "Gamma Match" options below.
- Do Not Normalize: This option should be used when
profiling a calibrated scanner that has a consistent (not automatic)
exposure every time. If you have software that can produce a "raw"
scan, for example, where exposure is identical in every scan, use this
option. Since "Do Not Normalize" tries to exactly match the
intended tone reproduction curve based on the shot of the test target,
you wouldn't want to use this option when profiling a camera because you
are unlikely to get the exact same exposure when you shoot different
scenes.
- Gamma Match: Select one of the following Gamma Match
options if you would like your profile to correct hue errors such as
color shifts or saturation problems without affecting tonality.
When profiling many scanners and cameras, it is often desirable to be
able to correct problems such as reds shifted to orange, purples turning
blue, undersaturation of yellow, and other color shift/saturation
problems while letting the device and its user settings determine the
tone curve. Most cameras/scanners use tone reproduction curves
that include "enhancements" to make images more vibrant in order to
obtain a "film like" quality. The "Normalize" and "Do Not
Normalize" options try to correct the curves in order to make them
linear/accurate and the result is often a dull or hazy appearance.
- Gamma Match (Auto): Being able to produce a profile
that corrects hue shifts and saturation without affecting tone curves
depends on the ability to discover the "base" tone curve; that is, what
the tone curve should have looked like before the device altered it to
make the photos have more pop and vibrance. For example, the
camera being profiled may have started with a typical gamma 2.2 tone
curve and then altered that curve to make the shadows a bit darker and
the highlights a bit brighter. In order to reproduce tone curves
as the camera intended (without altering them), Profile Prism must
find/use the underlying gamma 2.2 curve as the tone reproduction curve
in the profile. Some devices (and raw conversion software) use an
underlying tone reproduction curve of gamma 2.2, others (typically raw
conversion software) use gamma 1.8 or 1.0 when color management is
turned off as it would be when you create a profile. Profile Prism should be able to
detect the underlying/base tone reproduction curve when you select Gamma
Match (Auto). In most cases, you will not need the manual options
below, but if you know the underlying/base tone reproduction
curve and Profile Prism is having trouble detecting it (because the
curve was modified too much by the device to be able to detect it), use
one of the manual Gamma Match options below.
- Gamma Match (2.2): Use Gamma Match (2.2) if you know
that the base tone reproduction curve used by the device is gamma 2.2.
If you are profiling in-camera JPEG's or images that have been saved to a
common work space like Adobe RGB or sRGB, or even ProPhoto RGB, the base curve will be gamma
2.2. All but a few of the common working color spaces are gamma
2.2 so if your images have been saved with an embedded color space, it
is likely gamma 2.2.
- Gamma Match (1.8): Use Gamma Match (1.8) if you know
that the base tone reproduction curve used by the device is gamma 1.8.
Some raw conversion tools (like Capture One when using "Embed Camera
Profile") and a few rarely used working spaces like Apple RGB and Colormatch RGB use
gamma 1.8.
- Gamma Match (1.0): Use Gamma Match (1.0) if you know
that the base tone reproduction curve used by the device is gamma 1.0.
Some raw conversion tools (like Bibble with color management turned off)
and some raw scans use gamma 1.0. If the image of the target looks
extremely dark when you open it in Profile Prism, chances are the base
gamma was 1.0.
- White
Balance: Again, since scanners have a static
light source, it is best to use "allow profile
to fix WB" when profiling a scanner. If color
casts appear in neutral gray areas, however, this may
be an indication that the exposure/color of your
scanner is not "locked" and changes from
scan to scan. If color casts appear in gray areas,
select "device dictates WB" instead so that
your profile will assume that the device knows how to
capture neutral shades.
- Brightness: Choose
the "Normal" setting if you would like your
profiled images to have an ideal tone curve (100%
accurate brightness). Set this parameter to a
positive value if you would like to increase
brightness and shadow detail, and a negative value if
you would like your profile to render images with
darker shadows and an overall darker appearance. Note
that the brightness here actually operates on a gamma
curve, so a more accurate name for this parameter
would be "gamma". The term "Brightness"
is used simply so that it is a more recognizable and
less confusing term.
- Contrast: Choose the
"Normal" setting if you would like your
profiled images to have an ideal tone curve (100%
accurate contrast). Set this parameter to a positive
value if you would like your profile to render images
with higher contrast, and a negative value if you
would like your profile to render images with less
contrast. Although the "Normal" setting
will ensure accurate contrast in the profile, some
photographers may prefer higher contrast results to
add more "pop" to images and increase
separation between foreground and background. Most
digital cameras and film processors deliver pictures
with higher than normal/accurate contrast. Higher
contrast tends to hide noise in the shadows and give
a more "intense" or "sharper"
feel to images, however, it also tends to destroy
some amount of shadow detail. Since anything other
than the "Normal" setting is considered an
"effect" or "enhancement", the
other values are available purely as a personal
preference since many people prefer more contrast
than provided by a totally accurate tone curve. The
"Normal" setting also provides the greatest
possible detail in the image, so if your normal
workflow includes any type of post processing using a
photo editor, it may be best to use the "Normal"
contrast setting since this will ensure that the
image has maximum detail.
- Saturation: Choose
the "Normal" setting if you would like your
profiled images to have ideal saturation. Set this
parameter to a positive value if you would like your
profile to render images with more saturation, and a
negative value if you would like your profile to
render images with less saturation.
- Bias Settings: The
red, green, and blue bias values may be used to
control unwanted color casts or to introduce
different coloring effects. For example, if the
profile produces a noticeable yellow cast, setting
the red and green bias settings to negative values
will reduce yellow in the profile. Bias changes can
be made to the entire profile (if "bias includes
grays" is checked) or only to non-neutral colors
(if "bias includes grays" is not checked).
Scanners can suffer from hue shifts when scanning
papers with different white points, while digital
prints can be affected by metamerism (prints having a
different appearance under different light), paper
brighteners, and other issues. These are just a few
examples where bias settings can come in handy by
allowing manual "tweaks" when necessary.
Note: always create profiles with bias settings at
zero and only change the color bias in your profile
if you deem it necessary.
- Reference Target:
This reference file identifies the actual color for
all color patches on your IT8 color target and is how
Profile Prism knows the actual colors on your target.
Simply look at the name of the data file listed here
and make sure that the same name/number is listed on
your reference target in the lower right corner. Note
that the target "version" is sometimes
referred to as the target "charge". If the
version/charge listed in the dropdown does not match
the version/charge listed in the lower right of the
reference target, select the proper file name that
matches. Once you have verified this entry, it is not
necessary to change it unless you start using a
different paper target that has a different version
number stamped in the lower right corner.
Step 2: Open and crop the
image of the target
- Click "File", "Open
Image" and browse to the folder that contains
the image of the reference target. Select one of the
images and it will appear in the image crop area in
the upper right of the window.

- Next, locate the
upper/left edge of the target in your image. To do
this, use the horizontal/vertical scroll bars on the
bottom or right of the image to scroll, or simply
click on the image in the window and drag it left/right/up/down
using the hand.
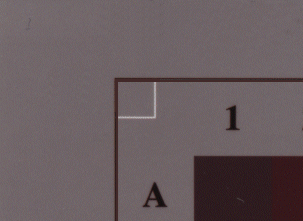
- Next, click the upper left crop corner
button.

- Your mouse cursor will now change to
an upper-left box corner when you move the cursor
into the image area. Move this corner to the very
edge of the target, placing it at the upper left edge
of the black rectangle that surrounds the row/column
labels as shown below. The corner marker is shown
below as a black/white dashed line.
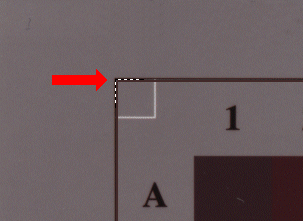
- Once positioned here, left click to
place the corner mark. You will notice a red corner
mark on the target image. If the corner mark is not
exactly on the outside edge of the black corner as
shown, simply repeat steps 3 and 4 until placed
properly.
- Repeat steps 3 through 5, locating the
other three corners of the target and placing their
corner marks appropriately. Note that the top two
corner markers should be placed at the edge of the
outer/black rectangle surrounding the text row/column
labels and the bottom two corner markers should be
placed below the gray scale.
Properly placed corner markers are shown below:
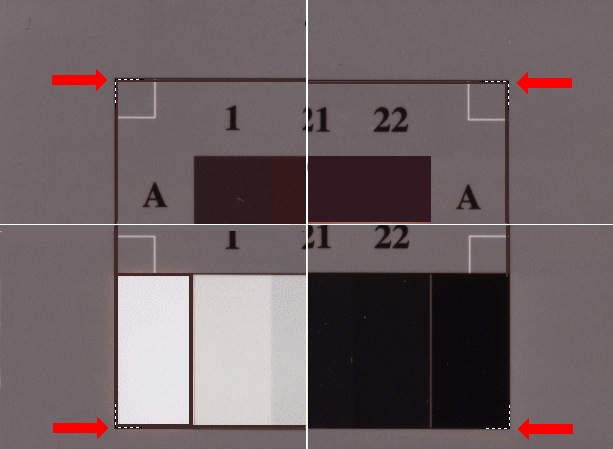
- Once all four corners of the target
have been identified, the four "corner buttons"
will only appear when you hover over them with the
mouse. When all four corner buttons are "deactivated"
and your target evaluation messages appear in the
"Messages" area, you'll know that you have
finished the cropping step. In addition, Profile
Prism will overlay white "punchouts" on
each color patch to verify alignment. The white
punchouts should appear within each individual color
patch on the target.
Note
regarding the "Jiggle corners" option: If
the "Jiggle corners" option above the image
is checked, Profile Prism will "jiggle" all
four corner markers to try to obtain the most
accurate target alignment. Note that this option may
move the red corner markers so that they no longer
align perfectly with the edges of the target. This is
normal since obtaining the best overall/average
alignment of the white punchouts may require moving
some/all corner markers slightly. To place the
corners manually without Profile Prism moving them,
simply uncheck the "Jiggle corners" box and
place the four corner markers again.
- Simply move
around the target and make sure that proper alignment
exists by ensuring that each individual color patch
contains a white punchout and that none of the white
punchouts appear to overlap into neighboring color
patches.
- Finally, review
your messages. At this point, Profile Prism has
examined the image of the target and has evaluated
white balance, exposure, and lighting of the target.
The details of this evaluation are displayed in the
"Messages" box on the lower portion of the
window. Here is a list of messages that are displayed
at this point:
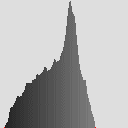
- Histogram: The
histogram that displays in the lower left corner
of the window after cropping a target can provide
useful information about the capture of your
color target. The histogram shows the
distribution of pixel brightness values from left
(black) to right (maximum brightness). The higher
the curve, the more pixels contain that level of
brightness. Ideally, brightness should be
distributed from left to right on the graph with
no large "clumps" of data on the left
or right. A large spike on the left of the
histogram indicates that some shadow detail on
the target was clipped (not visible because it is
completely black or zero in one or more RGB color
channels). A large spike on the right side of the
histogram indicates that some highlight detail on
the target was clipped (not visible because it is
completely white or maximum in one or more RGB
color channels). Depending on the device being
profiled, it may be impossible to achieve an
"ideal" histogram where brightness is
distributed throughout the entire 0-255 data
range, but try to minimize "clumping"
of data on the left/right as much as possible.
Below are some examples of "good" and
"bad" histograms.
Good histograms:
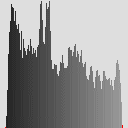
The above shows a typical histogram of the IT8
reference target. The red endpoint markers on the
left/right are very short, indicating that only a
very small amount of data is at minimum/maximum
brightness.
Bad histograms:
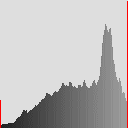
The above histograms show data that is not
uniformly distributed indicating improper
exposure of the image. The graph on the left,
although it certainly captures the entire range
of brightness values in the image, is
underexposed. With the histogram compressed into
the lower portion of the graph, less data range
is available for profiling and the resulting
profile may not be as accurate as it could be if
the brightness values were more evenly
distributed. The image that generated the left
histogram above will look dark and dull.
The histogram in the middle shows two problems.
First, the red line on the right (although
relatively short), indicates that some pixels in
the image were at their maximum brightness (255).
Also, notice how the data doesn't start until
about 1/3 from the left. This indicates that
there are no dark pixels in the image which
compresses the capture range and makes black look
gray. The image that generated this histogram
will appear with a "haze" since
contrast is lowered by the absence of true blacks
and dark colors.
Finally, the histogram on the right shows a very
large red (maximum) indicator on the right,
indicating that many pixels were at their maximum
brightness. This image is very overexposed and
will not profile accurately. In addition, the
histogram on the right also shows a red spike on
the left indicating that some pixels were at zero
(minimum) which can indicate loss of shadow
detail. The image that generated the right
histogram above will look super bright and
oversaturated as well as being very contrasty.
Unfortunately, images like this are what many
scanners capture when set at their default values.
Such images will have very vibrant color and a
high level of "pop", but are far
from realistic and will not profile well because
much of the color target (in the shadows and
highlights) cannot be captured due to data/pixels
being "off the scale" by being too dark
or too bright.
When possible, all of the above conditions should
be avoided/minimized by tweaking the scanning
software controls if possible. The problem must
be corrected up front (at scan time) and must not
be corrected with photo editors after the fact
since this cannot bring back clipped data that
was lost due to an overexposed scan. Overexposure
or clipping can normally be addressed by setting
"shadow" to zero, "highlight"
to 255, and gamma to 1.0 in your scanning
software. If the white patch in the lower left of
your targets is not clipped, but there
is still a red line on the right of your
histogram indicating some values at maximum (255),
it is possible that the scanner is oversaturating.
In that case, reducing saturation by 25% normally
will bring the saturation into range and prevent
the saturation clipping.
- Exposure:
Proper exposure is judged by the brightness of
the white patch on the target (bottom left of the
IT8 target). An ideal exposure will return RGB
values of about 240,240,240 for that patch.
Profile Prism will report an underexposure if the
values drop below about 220 and an overexposure
above 250. If the image is overexposed, some
values could be clipped (beyond the recording
range of the scanner) causing problems with
highlights. If the image is underexposed, the
image could look washed out when the profile is
used because only part of the scanner's tone
curve was captured.
- White balance:
Exact white balance indicates that there is no
color cast to true grays/white on the target.
Profile Prism will indicate whether white balance
is inaccurate and to what extent. The percentage
displayed is the amount that the RGB channels
differ when evaluating a neutral color patch.
Since neutral color patches should have equal RGB
values, a 5% value here would indicate that there
is a 5% color cast in neutral colors (a 5%
difference between the minimum RGB value and the
maximum RGB value for a neutral color patch). The
higher this number, the more inaccurate the white
balance. Inaccuracies in white balance will cause
inaccuracies in the profile because there will be
a color cast over the entire target. Note that
white balance is not normally an issue (and is
rarely "controllable) in scanners.
- Lighting variance:
Like white balance, the lower the number here,
the better. This is the maximum variance in
lighting measured around the edge of the IT8
target. A value of 5% indicates that there is a 5%
variance in lighting. That is, the darkest part
of the target is 5% darker than the lightest. In
a perfect scan, there would be no variance in
lighting across the target. Variables like
reflections inside the scanner bed and
reflections from the target itself can cause
minor variations in lighting. There are two
things you can do to improve lighting when
scanning. The first is to ensure that you scan
with a black background (black construction paper).
The second is to move the reference target closer
to the middle of the scanner glass rather than
placing it against the edge/top.
- Pixels at min/max
brightness and clipping:
Pixels at min/max brightness:
When Profile Prism examines an image of a target,
it will determine the range of brightness values
captured in the target, that is, the darkest and
brightest pixel values found on the image of the
target. Due to limitations of the capture device
or simply due to the brightness range found on
the target, these minimum/maximum values need not
always be 0 and 255. An image of a target, for
example, may range from 4-251, meaning that the
darkest pixels found were a brightness of 4 and
the brightest were 251. Profile Prism will report
the number of color patches that contained at
least some pixels that were at minimum or maximum
brightness. Obviously, there must always be a
darkest and brightest patch on the target, so at
least two patches will always be reported as
containing these darkest/brightest pixels. If a
large number of color patches are marked as
containing the darkest or brightest possible
values however, it may indicate a problem. The
message displayed will start with "Note:"
if there are less than ten color patches
containing min/max brightness and "WARNING:"
if there are ten or more color patches that
contain pixels at min/max brightness. A large
number of patches that contain min/max brightness
could indicate that the device that captured the
image of the target simply "ran out of room"
and bottomed/topped out. In a case where many
color patches contained pixels of min/max
brightness, since many pixels were found at min/max
brightness, it is likely that at least some of
them could not be properly recorded and the actual
value could not be determined. Some things that
can cause such a "truncated" range
include: overexposure, oversaturation,
inappropriate gamma setting, etc. If you get 10
or more patches at min/max brightness, try
changing the exposure (shadow and highlight
values on a scanner for example), the saturation
setting, or the gamma setting to see if it brings
more patches into range.
Clipping: In contrast to color
patches that contain some bottomed/topped out
pixels, clipping can occur in more extreme cases.
Clipping is a condition where all pixels in a
measured color patch are at their min/max value
or there was some anomaly in the measurement that
indicates that the values in those patches cannot
be depended upon to be accurate. There are three
conditions that can cause clipping: (1) every
pixel measured in the color patch was at min/max
value, (2) no incidental variation (noise) was
found in pixels: they were all measured at
exactly the same value, or (3) no difference was
found between two consecutive color patches. Any
of these three conditions normally indicates that
the value measured is probably not accurate. Once
again, try altering exposure, saturation, or
gamma settings to compensate. The number of
clipped patches (marked with a black "X"
marker) should be minimized since this indicates
that the entire target could not be captured and
may result in less accurate profiles.
"X" markers and what they mean:
Green
"X": A
green "X" indicates that some pixels
were at the minimum value (shadow threshold).
Since some pixels were at minimum value and some
were not, this often indicates that the color
patches in question are simply the darkest
measured patches on the target. If only a few
patches contain green "X" markers, no
problem is indicated. If a large number of green
"X" markers appear however, it could
mean that the color is at or near the minimum
brightness value detectible by the device. In the
case of many green "X" markers, your
capture device may simply not be detecting dark
colors reliably and this could be an indication
of underexposure, inappropriate gamma setting, or
simply a limitation of the device being able to
capture darker colors.
Red
"X": A
red "X" indicates that some pixels were
at the maximum value (highlight threshold). Since
some pixels were at maximum value and some were
not, this often indicates that the color patches
in question are simply the brightest measured
patches on the target. If only a few patches
contain red "X" markers, no problem is
indicated. If a large number of red "X"
markers appear however, it could mean that the
color is at or near the maximum brightness value
detectible by the device. In the case of many red
"X" markers, your capture device may
simply not be detecting bright colors reliably
and this could be an indication of overexposure
or oversaturation.
Black
"X": A
black "X" on a color patch indicates
that the color patch was clipped. This condition
is worse than pixels being at min/max value since
it indicates a problem where inaccurate capture
of the color patch is nearly guaranteed. See
"Clipping" above.
Scrolling through clipped patches:
To locate and scroll through the clipped patches
on the target to view them, simply click on the
"WARNING/Note: n patches are at minimum/maximum
value..." message in the message box on the
bottom of the window. Each time you click on the
message, Profile Prism will move to the next
clipped patch on the target.
Densitometer: To further assist
with evaluating the colors in your captured
target image, Profile Prism offers a densitometer
that can be used to view the measurements for
each color patch. After all four crop corners
have been placed on a target image, you can point
to any color patch on that target and right click
to see Profile Prism's evaluation of that color
patch. You will be able to view the original
measured color of the patch. Using the
densitometer, you can determine which color
channel is clipping (if clipping occurred) and
the exact color that was measured. Note that when
examining color patches that are clipped with a
black/green "X" marker, you will rarely
see RGB values at their minimum/maximum value
because you are viewing the RGB average over many
pixels. Only some pixels were found to be
clipped, so the average measured values will not
normally show clipping.
NOTE: After you click "Create
Profile" and the profile creation process has
completed, the final messages displayed in the "Messages"
box will be saved and associated with the image file that
was used to create the profile. To recall the messages
for a previous profiling session, simply click "File",
"Recall Messages For" and select the image file
used to create the profile. The messages will be recalled
from the last time a profile was created based on that
image.
Step 3: Generate the
profile
Now it's time to sit back and let Profile
Prism do its number crunching.
- Click the "Create Profile"
button in the lower left corner.

- Note that Profile Prism will be
performing billions of mathematical operations in the
process of creating your profile, so it may take
several minutes to generate a profile. You may follow
progress by observing the progress bar at the bottom
of the window.
- Note that once profile generation is
complete, the location of your new profile is visible
on the status bar at the bottom of the window.
- Make a final
review of the messages displayed in the "Messages"
box. Were any messages added? Profile Prism will add
messages as the profile is being generated. These
messages are:
- WARNING - color patches
detected out of correction range: Like
an evaluation of "Fail" in the spectral
sample range, this warning message is very rare
and will normally not appear. It indicates that
Profile Prism found color patches on the target
that are so far off that it could not correct
those colors completely. While some color patches
may not be 100% accurate in the profiled image if
this message appears, it doesn't mean that the
error will be visible. In fact, the profiled
colors will always be more accurate than
the original. This message simply means that
Profile Prism was only able to improve
the colors but not able to make them 100%
accurate. This message usually indicates that
there are large errors in color rendering by the
device in a small range of colors in the spectrum.
III.
Scanners and Metamerism
Metamerism is defined as a shift
in color when viewing the same subject under different types of
light sources. If you have ever matched clothing or fabric by
examining against a swatch in a retail store only to find that
what matched perfectly in the store is quite different under your
home lighting, you have fallen victim to metamerism. Some types
of lighting are good for evaluating colors while other light
sources are inherently poor. Sunlight, for example, is a very
good light source for evaluation of color due to direct sunlight
having a smooth, full spectrum of color. Fluorescent and
incandescent lights are examples of light sources that often
bring out metamerism due to their poor coverage of the light
spectrum.
All photographic media are prone
to metamerism to some degree. To make matters worse, the cold
cathode fluorescent tubes used as light sources in most scanners
can bring out metamerism in prints since scanner light sources
are neither full spectrum nor do they offer smooth coverage of
the light spectrum. The photographic media used to create
standard IT8 targets often shifts toward magenta under scanner
illumination. The resulting profile will compensate for the
magenta cast on the IT8 target by adding green. The profile will
work perfectly for the scan of the IT8 target but since normal (film
based) photographs will likely not contain the same magenta
metamerism shift as the IT8 target, this often makes IT8 based
scanner profiles appear too green when used on other media.
Fortunately, there are ways to compensate for metamerism caused
by the scanner light source and differing media.
Unfortunately there is no way to
measure the effect of metamerism to compensate for it
automatically. You may find yourself scanning a variety of media
and the characteristics of that media with respect to metamerism
will not be known. Fortunately, Profile Prism does offer two
methods of dealing with metamerism when profiling a scanner.
Simply put, if noticeable color shifts occur when using a scanner
profile developed using the recommended settings at the top of
this page, try changing "White Balance" from the
recommended "Allow profile to fix WB" to "Device
dictates WB" instead. When "White Balance" is set
to "Device Dictates WB", Profile Prism will use the
scanner's internal tone curves to compensate for metamerism in
the IT8 target. This will result in a profile that works properly
assuming no metamerism is present in the media you are scanning.
In addition, you may also use the
matte CRxxxxxx target to profile your scanner (see camera profiling instructions for information on use of the matte target). The matte
target is less affected by metamerism than the IT8 target and may
provide more balanced results under your scanner's light.
IV.
Utilizing Profiles Generated by Profile Prism
Note that the above instructions relate to
generating an ICC profile for scanners. Since an ICC profile is a
standardized method for describing how a scanner records color
information, using these profiles with images from your scanner
is a task left up to your imaging/editing software. Inexpensive
software does exist which allows you to fully utilize ICC
profiles for color management of images, batch conversion, etc.
One such ICC aware application is Qimage, also produced by ddisoftware, Inc.. As stated
elsewhere, consult the help or users manual of whatever ICC aware
imaging/editing software you are using for assistance in making
use of your ICC profiles once created. In Qimage, some relevant links that provide help and
understanding of ICC profiles are:
Understanding ICC Profiles
Qimage Learn by Example: ICC Profiles Section
Note that whatever software you use, there is a
standardized folder for which ICC profiles are normally stored.
The following are "standard" locations for ICC profiles
depending on the operating system used. It is recommended that
you save your profiles in these locations since most software
will look here for them:
Windows 95, 98, 98SE, ME: \windows\system\color
Windows NT/2000: \winNT\system32\spool\drivers\color
Windows XP: \windows\system32\spool\drivers\color