Getting Familiar with Qimage Ultimate
First a note about skins: Note that the appearance of the above window and other windows is controlled by "skins" that can tailor the appearance for different tastes and workflows. Click "Edit", "Preferences", "Skins" from the top menu to change the appearance of windows displayed in Qimage Ultimate.
"Queue" terminology: "Qimage" gets its name from the fact that many photos can be Queued to print. This document will often refer to "the queue". The queue in this context simply means "the document" that you've created by adding prints to the preview page. If a thumbnail has been added to the preview page at a size of 5x7 for example, we might say that there is a 5x7 of that image "in the queue". Please keep this in mind when referring to the help: "in the queue" simply means "in the current document to be printed". If you click on the "Print Queue" tab in area 4 above, you can actually see the files that are in the queue ready to be printed (or batch processed).
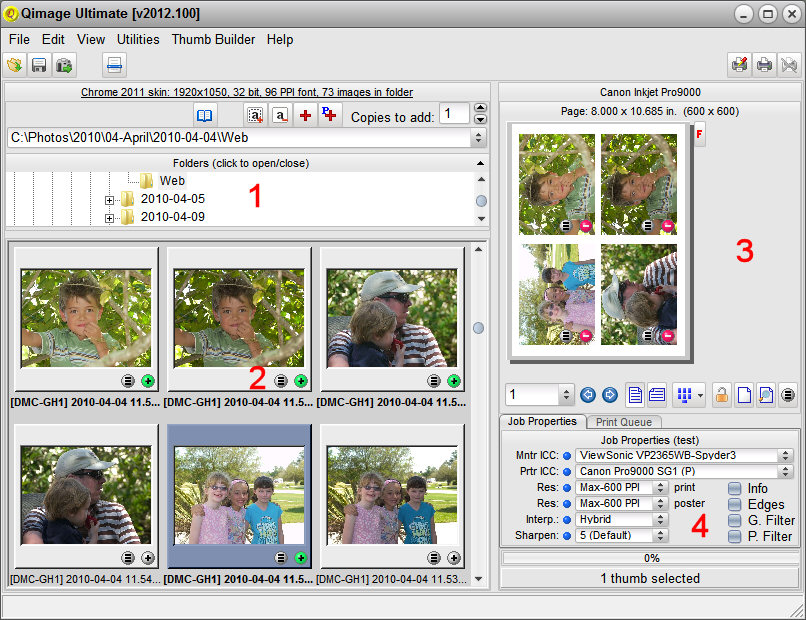
Major areas of the main window: red labels 1-4 on the figure above
Area 3 is the preview page. This page shows a preview of how prints are arranged and what your page(s) will look like when printed. To change the appearance of prints on the preview page, you must first select the print(s) you want to change. For example, select two prints and then change the print size by clicking the Print Properties button on either selected print, then select "5x7" or some other print size in the Print Properties dialog. The buttons under the preview page can be used to move forward or back to view other pages, change the page from portrait to landscape, etc. Note that the "Edit Page" button under the preview page opens a full featured page editor where print cropping, placement, text annotations, and other functions can be performed. Not all page editing functions are available on the small preview page in area 3 so use the Edit Page button for more options. All functions that can be applied to selected prints (new size, rotate print, etc.) can be accessed by right clicking on the the preview page (on any print).
Tips:
- Hover your mouse over any thumbnail in area 2 or any print in area 3 and press the middle mouse button to preview that image at a larger size.
- Hover your mouse over a print in area 3 to view details about that print (size and available PPI/resolution).
- Hover your mouse over the "+" on a thumbnail in area 2 to see the current (last used) print size. Click the "+" to add a print at that size.
- Double click on a thumbnail in area 2 or a print in area 3 to edit that image.
- The Print Properties auto-popup (where you can select print sizes, borders, etc.) opens automatically whenever you click on a thumbnail or a print.
- Click the "-" button on any print to remove that print from the page.
- Click the print placement button at the bottom of area 3 to choose how Qimage auto-arranges prints on each page.
Printing multiple images: the simplest workflow
Due to the very high level of functionality available in Qimage Ultimate, typical workflows can vary widely depending on whether or not you need/want certain features. The following, however, is a good baseline of how to quickly print images assuming you know which images you would like to print:
- Use "File", "Printer Setup" to select your printer, paper, and paper size.
- Use area 1 to navigate to a folder that contains images that you want to print.
- Select one or more thumbnails from area 2. The Print Properties auto-popup will open automatically. Select the desired print size and the selected thumbnails will be added to the queue (preview page) at that size.
- Click the "Print" button on the upper right of the main window.
Note: the above identifies a method of printing multiple images at the same print size. A vast array of functions exists which allow you to change the appearance of your printout even after you have added images, but the above identifies the minimum recommended steps to simple multiple image printing. If you routinely print multiple images at different sizes within the same printout, simply select thumbnails one at a time and click the desired size in the Print Properties auto-popup.
Printing multiple images: previewing each image prior to adding to the queue
The following outlines the simple steps required to preview images prior to printing.
- Use area 1 to navigate to a folder that contains images that you want to print.
- In area 2, select all thumbnails that you believe to be candidates for printing. You can multi-select using the standard Windows Ctrl-click or Shift-click methods. If you would like to preview all thumbnails in the current folder, simply right click in the thumbnail area and click "Select All". All thumbnails will be selected.
- Right click in the thumbnail area (area 2) and choose "Preview/Add to queue".
- Images will be displayed in a separate window and in a larger format. You may use that window to scroll forward/back through the selected thumbs using the left and right arrow buttons.
- As each image is displayed in the large preview window, you may click "Add" to add that image to be printed. Alternatively, you can check "Select this image" at the bottom of the preview window to simply refine your selection of thumbnails. Once you close the preview window, only the thumbnails you selected will be marked in the thumbnail grid (area 2)
Changing/modifying settings after adding images to the queue
There are a host of options available for changing the appearance of your pages/prints even after you have created a document. Many commonly used features such as ability to change the size or fit of prints on the page, etc. can be accessed simply by selecting one or more prints on the preview page(s) and then using the controls in area 8.Visual/manual sizing and placement and more complex functions can be performed by opening the full page editor using a right click on the preview page and selecting "Edit Page".