Add Another Copy of this Image
Add to Queue
Albums
Antialias setting (for downsampling)
Auto Preview (image editor window)
Auto Rename
Blemish/pixel corrector
Borderless overspray/expansion
Borders around prints
Browse Selected Image's Folder
Canvas printing
CCD Noise Filters (dark current, shadow
noise, and high ISO filters)
Context Sensitive Help
Color Management (ICC support)
Comparator
Copyright/signature
Cropping Images (to fill print size
exactly)
Curves Filter
Cutouts (framing images)
Dark Frame Subtraction
Defaults (for print size and fit)
Delete Filters
Edges
Editor Functions
Edit Images
Edit IPTC Image Info
Edit Page (Full page editor)
E-mailing photos
EXIF Hotbar
EXIF info (view image info)
Exposure compensation
File Dropdown Menu
Filters (managing associated filters)
Flash Card Copy/Move
Floating Text
Folder History
Freehand - manually placing images on the
page
Fringing Filter (purple/green fringing)
Full screen view
Global Filter
High Quality Work Image (image editor window)
Hyper Processing
Image Fitting
Image Lock
Image Placement
Instaview
Info Stamp
Interface (filenames versus thumbnails)
Levels Filter
Lossless JPEG Transforms
Margins
Mirror
New Session w/Selected
Optimizing layouts for certain size prints (4x6,
etc).
Page Background Color
Page Orientation (portrait/landscape)
Page Preview
Page/Paper Size (changing)
Photo Editors (using with Qimage)
Plugins
Preview (while adding images to queue)
Print Filter
Print Image Information (under each print
when printing)
Print Info/Annotation Font
Print Interpolation and Spooling Options
Print/Job Logging
Print/Job Logging and Tracking Paper/Ink Usage
Print Proofs
Print Rotation
Print To (printer or file)
Printer Setup
RAW Format Options
Red Eye Correction
Reordering Prints
Scrapbooks
Search IPTC Image Info
Selected Thumbs/Files (Copy, Move, Rename,
Auto Rename, Delete, Recycle)
Selective Color Filter
Slide Show (to view images in the queue full
screen)
Soft Proofing
Sort Prints
Templates (creating manual templates and
retaining image positions)
Test Strips
Thumb Builder
Thumbnail Font
Thumbnail and Raw Cache - Managing Disk Space
Thumbnail Quality
Units (of measure)
Unsharp Mask
Utilities (file manager, Flash card copy/move)
White Balance Filter
Add Another Copy of this Image - Sometimes you may be looking through images that you have already placed on the preview page and decide that you want more copies of certain images. To accomplish this, select image(s) on the preview page and then right click on the preview page and select "Add Another Copy of this Image". Qimage will add another copy of each image to the preview page (queue). You may repeat this command as many times as you like to increase the number of copies in the queue indefinitely.
Add to Queue - add the images selected in the thumbnail grid to the queue at the current (last used) size. As alternatives, you may click the small "+" icon on a thumbnail one at a time, select thumbnail(s) and then press the insert key, or drag the selected thumbs onto the preview page in the upper right corner of the main screen. When you drop the images, they will be placed on the page/position where you dropped them.
Access:
Alternatives:
Albums - Qimage Ultimate allows users to create albums and store photos in those albums for the purpose of quickly locating certain types of photos. For example, a nature photographer might find it useful to create an album called "Roses". Once the "Roses" album is created, the photographer can easily add images to the "Roses" album from any folder on any available disk drive. When the "Roses" album is opened at a later date, it will show thumbnails of all the roses added to that album regardless of what folder/drive they reside in. Note that the album simply points to photos in various locations so photos are not duplicated and the photos in an album must remain in their original locations (where they were when the photos were added to the album). Here is a brief overview of functions related to creating and managing photos in albums:
Antialias filter for downsampled images - Click "Edit", "Preferences", "Printing Options" to access the interpolation settings. Move the antialias lever to control the strength of the antialias prefilter that is applied when downsampling images and prints. Note that this setting affects not only prints (usually those being printed at very small sizes) but also images downsampled via the image editor, e-mail/web conversions, etc. Also note that the antialias setting only applies to images that are being downsampled (resolution is being decreased) and the setting has no effect whatsoever on images being upsampled (resolution is being increased).
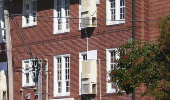
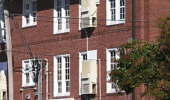
Aliasing is an artifact that can be visible in areas that have small, repeating patterns such as brick walls, stripes in a shirt, fence posts at a distance, etc. Sometimes called "moiré", the artifacts may look like heat waves. See the example below to see the aliasing caused by a brick building being downsampled, and how the "Med" antialias setting removed the aliasing artifacts.
|
|
| Straight downsize | w/antialias at "Med" |
Auto Preview - The "Auto Preview" option is located on the "View" menu in the image editor window. If enabled, auto preview causes a small filter preview window to open whenever a filter change is being made. For example, when adding contrast, click on the up/down arrow next to the contrast parameter. As soon as the contrast is changed, a small preview window will open showing the change in real time. When finished, the changes can either be accepted (by clicking OK) or canceled (by clicking Cancel). When auto preview is turned off, the preview window can still be activated manually by right clicking on the image. To preview filter changes in real time with auto preview off, simply right click anywhere on the displayed image to activate the preview window and then make the desired filter changes.
Auto Rename - Auto rename provides a method for renaming files to the stored image date/time, etc. There are two ways to auto rename in Qimage.
Method 1 - When you use the Flash Card Copy/Move Utility (accessed by clicking "File" from the top menu bar on the main screen and then clicking "Flash Card Copy/Move"), you can rename files as they are moved from one folder (or flash card) to another folder. Click "Edit", "Settings" on the Flash Card Copy/Move dialog and check the auto rename box if you'd like files to be auto-renamed when downloading photos from flash cards.
Method 2 - You can auto rename files that already exist without copying/moving them. To auto rename existing files, simply navigate to the folder containing the files and select the thumbnails to be renamed. Then right click in the thumbnails area and select "Auto rename" from the dropdown menu.
Changing the auto rename format - To change the format for renaming files, click "Edit", "Preferences" and "Auto Rename Options" and change the renaming parameters.
Renaming note: Qimage will use the date/time stored in the EXIF header if one exists. If no EXIF header is present, Qimage will use the date/time stamped on the image file itself (file date/time). Qimage will never overwrite a file when auto renaming. If a file already exists with the given rename format, the next image renamed will be succeeded with an occurrence number. If for example, you had three images with the same date/time (not likely), you would have something like this:
1999-06-15 13:46:20.jpg
1999-06-15 13:46:20(0001).jpg
1999-06-15 13:46:20(0002).jpg
Limit: Qimage does have a limit of 9,999 files when auto renaming, so if you reach (9999) for example, the remaining images will simply not be renamed.
Blemish/pixel corrector - Blemish correction is an alternative to cloning that is faster and more efficient. Use this option to remove blemishes, red eye, unwanted small objects, or stuck pixels from your photos. To access the blemish corrector, double click on an image in the thumbnail grid or on the preview page. You can then check the "Blemish/pixel corrector" box to enter pixel locations manually, but most of the time you will want to visually "melt away" the blemish. To do this, perform the following steps:
Summary of the two methods of blemish correction:
![]()
Consider the above icon. It is a reminder to always drag from the center toward the left to correct red eye and from the center to the right to fill in blemishes. Remember that Qimage will "pull" the edge color inward to fill in blemishes when dragged to the right. In contrast, it will perform a darkening of pupil when dragged to the left.
Borderless Overspray/Size Expansion - Many print drivers offer a "borderless" or "no margins" mode that allows printing from edge to edge and top to bottom with no white border. If you would like to print a 4x6 print on 4x6 paper for example, you would expect the 4x6 print to align perfectly with the edges and top/bottom of the paper. Unfortunately, printers do not load paper precisely enough to cover exactly 4.0 x 6.0 inches of paper with a 4.0 x 6.0 inch print simply because the paper loading and positioning process is not exact. To compensate and insure that you don't get small slivers of white on the top, bottom, left, or right of your print, most print drivers artificially "expand" prints so that they are larger than necessary and so that part of the print actually oversprays onto a sponge behind the roller. When printing your 4x6 on 4x6 paper for example, the driver might see the 4x6 print and expand it to 4.2 x 6.2 so that 0.1 inches of the print overspray the left, right, top, and bottom, thus insuring that you have full coverage as long as the paper loads within 0.1 inch of the expected location. This expansion/overspray characteristic is a common feature of most print drivers, however, the artificial expansion of print sizes and overspray off the edge of the paper create problems of their own.
While expanding a 4.0x6.0 print (as selected in your printing software) to 4.2 x 6.2 might be acceptable in most cases, this "size expansion" can cause other issues. If you are printing three 4x6 prints to a borderless 8.5 x 11 page for example, you will find that your 4x6 prints are a little larger than 4x6. Overspray can also cause unwanted cropping since part of the image might actually be oversprayed beyond the edge of the paper, making your prints look like they are missing some of the edges. There may be times when you would like to use borderless mode but you also want to insure that you get the exact sizes you ordered and you want to insure that parts of your prints are not oversprayed past the edge of the page. In these situations where exact print sizes and minimizing overspray are important, click "Edit", "Preferences", "Print and Page Formatting" from the Qimage main window and select "Borderless Overspray/Expansion" and choose "Disable Overspray and Size Expansion". This will allow you to print exact print sizes and also minimize overspray off the page. Such an option is important, for example, if you are creating a layout of multiple photos on an 8.5 x 11 borderless page and you simply want to use as much space as possible on the page but you still want exact print sizes and you don't want part of your prints to be clipped at the edges of the page. Note that when you disable expansion/overspray, however, you are subject to the accuracy of the paper loading mechanism so you may still find that you have a 1/32 inch white border on the left and 1/32 inch clipped on the right simply because the paper didn't load perfectly. If the paper loading error is consistent (always 1/32 border on the left and missing 1/32 of the image on the right), you can compensate by using "Edit", "Preferences", "Print and Page Formatting", "Page Margins". In this example, enter a margin of -1/32 inch on the left and 1/32 inch on the right: -0.03 left and 0.03 right.
NOTE: Disabling borderless overspray/expansion will only affect jobs printed to a printer. This option (the allow/disable selection) will have no effect when you are printing to file. Normally when printing to a file, you are preparing a job for a printer that is not available/connected so the printer cannot be queried for capabilities to allow for accurate disabling of borderless overspray/expansion. As a result, the setting (allow/disable) for the overspray/size expansion is ignored when printing to file.
Borders - Borders may be added to prints to create edge effects, add spacing for photo mats, and more. Borders of any size and color may be added by using the "Brdr" parameters in the "Print Properties" auto-popup panel that appears whenever you select a thumbnail or print on the main window. Note that these controls are also available in the full page editor by clicking the "Size/Loc" button. Two borders may be added to each print: border 1 is the border closest to (touching) the print and border 2 is a second border on the outermost edge of the print. To activate a single border around a print, simply enter the size (thickness) of the border in inches or millimeters (depending on your setting for "Units") in the left box labeled "1" under the print sizes. To change the color of the border, click the small color patch marked "1" next to the left edit box. If you would like a second border which will appear around the first border, repeat these steps for the right edit box and the color patch marked "2".
The "B" and "B+" radio buttons allow you to specify whether you want your borders inside the selected print size or outside. As an example, if the "B" radio button is selected and you choose a 4x6 print size, the final print will be 4x6 with borders included on the inside. If the "B+" radio button is selected, the photo will be sized to 4x6 and then the borders will be added outside that photo size, making the final print larger than 4x6. Simply put, use "B" when you would like your borders to show inside a specified frame size. Use "B+" when printing photo mats where you want the photo to be the specified size with the borders extending beyond that size. Note that in order to prevent sizing problems, Qimage may switch from "B+" to "B" if it determines that the borders will not fit on the page. For example, when using 4x6 borderless paper and a print size of 4x6, Qimage will not allow use of the "B+" border and will automatically use the "B" option since the "B+" option would create a print larger than 4x6 that would no longer fit on the 4x6 page.
Application of borders: You may set up border parameters prior to adding images to the queue and each print will contain the specified border as it is added to the queue. You can also change the borders on an existing print by first clicking the print on the preview page. Once you have selected a print (or prints) on the preview page, simply change the border parameters on the "Print Properties" auto-popup window and the prints on the preview page will update with the new border parameters.
Canvas edges: Qimage Studio Edition allows mirrored and stretched borders in addition to solid color borders. Mirrored and stretched canvas borders can be used to create a continuous appearance when mounting canvas prints so that the wrapped edges appear to blend with the photo. To mirror or stretch edges for canvas mounting:
Via the custom "wizard":
- Select the thumbnail of the photo that you would like to print on canvas.
- Drop down "Size" in the "Print Properties" auto-popup panel on the main window and select "Custom".
- Check the bottom sizing method labeled "Canvas print with wrap".
- Fill in the print size, the side and back wrap depths, the side wrap border style (Solid, Mirror, Stretch), and check "Fold Marks" if you want center/fold marks (see notes below).
- Click "OK" on the custom "Special Sizes" dialog and your photo is ready to print.
Via manual selections:
- Select the thumbnail of the photo that you would like to print on canvas.
Make sure the cropping (scissors icon) is ON in the "Print Properties" auto-popup panel on the main window.
Click on the color patch to the left of border 1 and select "Canvas Edge (Mirror)" or "Canvas Edge (Stretch)".
- In border 1's size, enter the size you want for the canvas edge (.5 inch, 1 inch, etc. depending on the thickness of the canvas mount)
- In border 2's size, enter any additional "back" wrap needed.
- Make sure "B+" border is selected.
- Drop down the size on the "Print Properties" auto-popup panel and select the size of your canvas as you normally would, not counting the wrap.
- Add an image to the queue by clicking the small "+" icon on its thumbnail.
Note about canvas edge previews: Mirrored edges will show darker than the main print on Qimage previews in order to highlight the separation between print and border. The mirrored border will NOT appear darker in actual prints since the border is only darkened to help with visual placement/cropping of the print on screen. If you would like to preview the page as it will print (without the darkening of the mirrored border), go to the full page editor (button under the preview page on the main window) and click the "HQ Preview" button to preview the page in high quality.
Canvas printing notes:
Canvas Edge (Mirror): Simply mirrors the edge of the photo out to the border size.
Canvas Edge (Stretch): Mirrors a smaller portion of the edge of the photo (one eighth of the border size), stretching it out to the border size.Canvas printing tip 1: You can test these effects such as edge marks to see which you like best by printing small test prints on a sheet of plain paper, or by printing to file and opening the printed file. You can also turn on the "Preview" option in your printer driver so that your printer driver displays a preview of the page before the printing starts. You can then accept/cancel printing.
Canvas printing tip 2: There are two typical ways to create canvas wraps. Using the wizard method above, these are:
- The most versatile canvas printing method is to print your canvas with a specified mirrored wrap and another outer (solid) border that will appear on the back of the canvas mount. A white back wrap, for example, is useful because it provides a nice area for printing fold marks and center marks for alignment. In addition, why use more ink than you need? No one will ever see the back of the canvas! Unlike example 2 below where we want to wrap the mirrored image onto the back of the canvas, you may want to have a small white border on the outside of your mirrored wrap/border. On a 20x30 canvas on a mount with 1x1 boards, you could enter 20x30 as the size, 1.1 as the side wrap (an extra tenth of an inch to ensure no white is showing on the sides) and a .5 inch back wrap. Check "Fold Marks" here and your .5 inch outer/solid back wrap will contain inward facing fold marks and center marks. Since these will appear on the back of the canvas, they won't be seen but will help with alignment. They also provide the space needed for stapling without wasting ink on the back of the canvas like example 2 below.
- A less popular yet just as effective method is to use a value in "Wrap (sides)" that is large enough to cover the depth of the canvas plus enough to wrap over the back for stapling. As an example, suppose you have a 20x30 canvas with 1 inch stretcher bars. You'd enter 20x30 for the print size and 1.5 inches for the side wrap, entering zero for the back wrap. If you use a mirror border, this will give you enough mirror border to wrap over the sides of the canvas mount and a half inch onto the back: enough for stapling. There is no need for a "back wrap" here because you've used enough side wrap to extend onto the back of the canvas mount. Note, if your back wrap is zero and you check "Fold Marks", the fold marks and center marks still appear inward from the edge of the print so the outer 1/8 inch (3mm) of your mirrored border will contain markings. As a result, be sure you've allowed enough side depth so that these marks print on the BACK of the canvas mount and are not visible on the sides!
Browse Selected Image's Folder - Qimage allows images from different folders (or even drives) to be present in the queue at the same time. If you would like to quickly browse thumbnails in the folder where a certain image in the queue resides, simply highlight a print on the preview page and then right click on that print and select "Browse Selected Image's Folder". Qimage will go to the folder that contains the selected image so that you may review other images in the same folder using the thumbnail grid. This is useful if you have forgotten to add an image and would like to locate other images from the same folder as an image already in the queue. Note that if multiple images are selected, Qimage will go to the folder for the first selected image.
Color Management (ICC) Support:
Qimage supports ICC profiles for input devices (cameras and scanners) as well as your printer and monitor. Color profiles are used to ensure accurate and consistent color for output devices. You can access Qimage color management by selecting "Edit" from the top menubar on the main screen and then "Preferences", "Color Management".
Intro:
Accurate color management requires that you address the three devices in your digital imaging workflow equally: your camera (input device) and your monitor and printer (output devices). Since color management requires that you have: (a) an ICC profile that describes the color response of your camera, (b) an ICC profile that describes the color response of your monitor, and (c) an ICC profile that describes the color response of your printer, it can be argued that there is no need to attempt color management or to work with ICC profiles unless you have data (profiles) for all three variables: camera, printer, and monitor. Using ICC profiles to manage color is like using a road map. You need to know the starting point and the ending point and then you can describe how to get from point A to point B. In the world of ICC profiles and color management, this means specifying an input/camera profile (starting point) and a monitor or printer profile (ending point). Your software (in this case Qimage) can then translate how your camera "sees" color into how your monitor or printer "sees" color. What you need to do to manage color properly is described below.
Details:
Device Profiles
First, define the color profiles for your output devices (monitor and printer). Click "Edit", "Preferences", "Color Management" from the top menu bar and then:
To set up a monitor profile: Click the "Monitor" tab and then check the "Enabled" box and click the "..." selection button to browse ICC profiles for your monitor. If you do not have a specific ICC profile for your monitor (most systems have some generic monitor profiles located in the C:/WINDOWS/SYSTEM32/spool/drivers/colo folder), you can select the generic sRGB profile from your Qimage folder. Please note that selecting sRGB or even a manufacturer supplied profile can lead to results that vary widely from monitor to monitor, system to system. This method of selecting a "generic" profile may work reasonably well in some cases, and not well at all in other cases. As a result, although it can't hurt to try an existing/generic profile as a first step, results may vary and may or may not be acceptable. sRGB should provide a reasonable middle ground for most monitors and for web display, however, sRGB will not match any particular monitor perfectly! It is best to use a monitor colorimeter (small device that attaches to your monitor with suction cups) to actually measure the response of your monitor. Although there are visual calibration utilities available that walk you through a visual inspection/calibration process, these programs provide nothing better than an educated guess for calibration and can often result in images not being accurately displayed. Also note that if you do not use a hardware colorimeter to create a profile specific for your particular monitor and use a generic color profile like sRGB, you may see too much red in your images, shifts of some colors, other color casts, etc. Note that even monitor profiles supplied by manufacturers can often be inaccurate, as these (although they may be labeled with your monitor model) are often developed for a whole line of monitors and are too generic to describe the response of the monitor sitting in front of you. Therefore, buying and using a colorimeter to produce an accurate profile is always recommended for the most accurate color possible. The colorimeter (most are between $200 and $300 in price range) will create a custom ICC profile for you that you can then activate in Qimage under "Edit", "Preferences", "Color Management", "Monitor". It may seem like a bit of an investment, but there is really no need to buy expensive digital cameras or scanning equipment if you have no way to calibrate your output devices to ensure that you are getting accurate color!
To set up a printer profile: Qimage offers three methods for printer color management:
Printer/driver manages color (default): If you do not have a profile (ICM file) specifically designed for the printer, paper, and ink you are using, it may be best to let the printer/driver handle color. In its default "out of the box" configuration, Qimage will allow the printer/driver to determine how to adjust color based on the paper type and quality selections made in the print driver. If you have made other selections for the printer profile in the past and would like to instruct Qimage to revert to allowing the print driver to manage color, simply select "Edit", "Preferences", "Color Management" from the main menu in Qimage, check the "Enable" box on the "Printer" tab and then press the "Let Printer/Driver Manage Colors" button. If the button is disabled, Qimage is already allowing the driver to manage colors. While this mode of operation will ensure good color even with the "ICM" checkbox unchecked in the driver, it is best to select the "ICM" option in your print driver if that option is available. Also, if your driver offers settings under the ICM heading, be sure to select "Applied by Printer Software" or its equivalent (do not select "no color adjustment"). Note that this option is considered the "normal" mode of operation if you do not have a printer profile or you do not want to take control of color management. Do not disable printer color management entirely (by unchecking the "Enable" box in the color management dialog) unless you are performing special printer testing or other tasks (see "OFF" below).
Qimage manages color (preferred): If you have a printer profile appropriate for the printer, paper, and ink you are using and you know the driver settings that are appropriate to use with this profile, it is always best to allow Qimage to manage color rather than letting the driver manage color as with the first option above. Qimage has access to all the information needed for full color management including the color space of the image, the printer profile, the rendering intent, and the status of black point compensation so it is always best to allow Qimage to perform the color management operations whenever possible to ensure the highest quality results rather than trying to pass this information to a printer driver that may or may not be able to handle the job of high quality color management. To allow Qimage to manage color, simply select "Edit", "Preferences", "Color Management" from the main menu in Qimage, check the "Enable" box under "Printer" and then click the "..." button to browse for your printer profile. Once a printer profile is selected, Qimage will manage color rather than the printer driver. At this point, you must ensure that the printer driver options are set as required for the profile. This normally entails selecting "no color adjustment" in the driver or "none" for print type plus selecting the proper paper type, quality, and other related settings. See note below for more details on driver settings required when Qimage is managing color.
OFF: If you do not have a paper-specific profile for your printer, it is best to use option 1 above where the printer/driver manages color. Only disable printer color management (by unchecking the "Enable" box under "Printer" in the color management dialog) if you want to send raw data to the driver. This option is useful when you want to print targets to be used for creating custom printer profiles. Printing photographs with your Prtr ICC turned OFF can result in inaccurate or shifted colors.
A note about using/selecting your own printer profiles and allowing Qimage to manage color: Please note that most printer profiles only apply to one media type, therefore it is extremely important that: (1) you have the right profile selected for your current media type and (2) your printer properties (under "File", "Printer Setup") are set to the exact parameters required for the profile. For example, most printer profiles are designed for the "no color management" mode in the driver since you are performing color management outside the driver. If so, you'll need to make sure that your driver settings are set appropriately. Please refer to either the software users guide if you created the profile yourself, or the instruction from the web site where you obtained the profile. When in doubt, set the print driver to the most "plain vanilla" settings as possible, i.e. the highest quality settings but NO color management. Remember that when you allow Qimage to manage color, you do not want to have the "ICC" box checked in your print driver unless your driver requires you to select "ICM" first in order to select the "no color adjustment" mode from within the ICM selection. If you do, you'll be doubling up on the profile (Qimage will profile it once and then your print driver will profile it again). As with calibration of your monitor (above), there is really no way to guarantee a color match unless you use profiling software to create a custom profile that describes exactly how your printer responds. Printer profiles that are available on the web are often too generic in nature to be 100% accurate and may be designed to be used with some other printing software. Once again, a little investment in money and time can ensure an accurate match for your printer. If you want a perfect match for your prints, you'll need custom printer profiling software, and you'll need to follow the instructions below entitled "Instructions for using printer profiling tools with Qimage".
To customize profile settings on a print-by-print basis: When printing photographs using a printer ICC profile, it is sometimes necessary to select the rendering intent on a print-by-print basis in order to achieve the best color. Qimage allows customization of printer profile properties, making it possible to select a different rendering intent or even a different profile for each print on the page. When images are first placed into the queue, they take on the general printer profile characteristics present on the "Job Options" tab on the main window. To modify these initial settings on a print-by-print basis, simply select the print(s) on the preview page and then right click on the preview page and select "Custom Color Mgmt Settings". You may then make changes to the color management settings for the selected prints and click "OK" to apply the changes. Customizing color management settings on a print-by-print basis is useful for testing different rendering intents or even different profiles to select the best fit for your photos.
Next, define the color space used by your input devices (digicam, scanner, etc):
About the image (input) profiles: You can associate multiple devices with ICC profiles using the grid under "Input profiles" on the color management dialog. The first line in the grid is always a "fall back" selection to be used when a specific device profile cannot be matched. You can add as many lines after this first entry as you like, specifying either the device model name (based on EXIF model number) or the resolution of the images. Using the grid to "tag" your devices with specific ICC profiles allows you to define the color spaces used by different devices. Most cameras and scanners, although their images may look acceptable without profiling, do not normally deliver images that truly conform to any known color space. If you have ICC profiles that define the color space used by your output devices like your printer and monitor, you need an input profile that describes the color space of your camera or scanner to be able to accurately display or print images. For example, if you have an ICC profile that describes the color space used by the Nikon CP990 camera, you could add a new line in the table, enter (or browse to) the profile name to that row in the table by clicking the "Select ICC Profile" button. Next, while still on the same row in the table, click the "Extract EXIF Model Name" button and select an ORIGINAL image (JPG or TIFF) from the CP990 camera. The model name "E990" will be entered in the table. It's that simple. Qimage will now use the specified ICC profile any time an ORIGINAL CP990 image is displayed or printed (provided you enabled the monitor and printer profiles - see above). We all know that EXIF information is not always preserved after modifying originals, so you can also specify the resolution as a last resort. For example, if you leave the EXIF model name blank and enter 2048 and 1536 in the X res and Y res columns respectively, Qimage will use the specified profile on all 2048 x 1536 images. Note that the only reason we need to have an input table that "tags" certain types of images with certain profiles is that most cameras do not embed the ICC profile inside the images they save. If you have a camera that saves the embedded profile information inside its images, there is no need to do this "external tagging": see "About embedded profiles" in the next bullet.
Some places to find profiles specific to your camera model:
Manufacturer: Some of the latest model cameras are supplied with ICC profiles on the software/driver installation CD. If you search those CD's for files with extension "ICC" or "ICM", you may be able to find a profile designed for your camera by the manufacturer. At the time of this writing, this is the exception rather than the rule. Most cameras are supplied with no ICC profiles to describe color response.
Camera itself: Some newer cameras allow you to select a color space (profile) for saved images and may, for example, allow you to select Adobe RGB or sRGB as the profile used to store images. If your camera allows you to specify the profile to use, it may be a generic profile such as Adobe, sRGB, etc. If so, you already have your camera profile. Just browse to \program files\qimage (default) and select the proper profile from that location.
DDI profile: The developer of Qimage (Digital Domain Inc.) may have developed a camera specific profile for your camera. The list of cameras that DDI has tested and supplies profiles for is available on the ICC Profiles Page. These profiles can be purchased for a very small fee, however, due to the amount of testing required to develop profiles, a profile for your specific model may not be available.
Custom profile: You could use a tool like Profile Prism to create a custom profile for your camera. Custom camera profiles often work well when shooting in raw capture mode and using a raw conversion utility. Custom profiles generally do not work well when shooting in JPEG/TIFF capture mode as these images have already been processed.
Generic profile: Depending on the camera model, it may be possible to get a relatively reasonable color match by using a generic "working space" profile. If your camera offers the sRGB/Adobe RGB color space settings, Qimage will most likely recognize the proper profile automatically. If you are unsure, it is best to stick with sRGB for photos from your camera.
About embedded profiles: Qimage supports embedded profiles which means that if there is an embedded profile, Qimage will automatically recognize it. Images modified in high end photo editors will normally be saved with the editing space (profile) saved in the image so Qimage should have no problem recognizing the proper color space. Note that if a profile is embedded in an image, the input table under "Color Management" is ignored and the embedded profile is used instead.
How ICC Profiles are Handled at a (Windows) System Level
What about profiles associated with monitors/printers at the system (Windows) level?
Some versions of Windows allow you to associate specific ICC profiles with your display and your printer(s). For example, you can associate an ICC profile with your monitor by clicking on your "Display", "Properties" and clicking the "Color Management" tab, adding an ICC profile to the list and activating it as the default. Note that this is simply a method of specifying which ICC profile is associated with your devices. Windows does not do anything with this information "internally", nor does it change anything about the appearance of your display at a system level as a result! This entry is nothing more than a placeholder that allows you to specify what ICC profile "belongs" to your monitor/printer. It is up to individual applications to utilize this information. Note however, that due to inconsistencies in how different Windows operating systems function (not all Windows versions even support color management), Qimage will ignore the entries entered here (at the system level, tagged to your devices). Instead, in Qimage, we use the "Monitor ICC" or "Printer ICC" entries to do this association.
About display "auto loaders"
Most monitor calibration utilities have two steps: (a) a step that allows you to get your monitor into a known working condition, and (b) a step that creates an ICC profile to be used in photo applications. The small "auto loaders" that change the appearance of your display when you boot your computer are designed only to get your monitor into a set of know working conditions. This loader does not load or utilize an ICC profile. The auto loader is used as a kind of pre-calibration that ensures that when the ICC profile is utilized, that it will work properly. These bootup auto loaders should not be confused with ICC profiles, nor should they be thought of as a true "calibration" of your monitor at a system level.
Other ICC Profile Related Issues Applicable to Qimage
About working spaces:
Working spaces available in your Qimage folder: Most of the popular working spaces (such as Adobe, sRGB, etc) are located in the Qimage folder - usually c:\program files\qimage). If you have the need to convert to/from or use working color spaces, simply click the "Utility Profiles" button on the color management dialog when opening a profile.
Profile to profile conversions:
Converting from one color space to another: You can convert images from one color space to another color space whenever you use the image editor or the image converter (right click in the queue, select "convert images"). The simplest way to convert from one color space to another is to add images to the queue and then right click on the preview page and select "Convert Images". You can then check "Perform a profile to profile conversion" at the bottom of the window, entering the "from" and "to" profiles.
Converting multiple files from multiple cameras: If you enter <input> in the "From" box, Qimage will select the appropriate device input profile using the information in the grid under "Edit", "Preferences", "Color Management". Using this parameter will allow you to convert a batch of Adobe RGB and ProPhoto RGB images from their respective color spaces into sRGB for example.
Appearance of thumbnail and draft images used in printout previews, etc.
Thumbnails and draft images: The images that you see in the thumbnail grid and on the small preview page will appear different depending on your settings at the time the thumbnails were created. When you enter a new folder or select "Refresh Thumbs", the thumbnails are saved using the current settings under "Edit", "Preferences", "Color Management", "Monitor". In other words, if you have monitor color management turned OFF and you select "Refresh Thumbs", your thumbnails will continue to appear as they do with color management OFF until you refresh them again with monitor color management ON. Similarly, thumbnails will appear as they do with color management ON if they were created that way and have not been refreshed. Qimage uses this method to speed up thumbnail display since profiling numerous thumbnails "on the fly" would slow down program operation.
Instructions for using printer profiling tools with Qimage:
The following tips apply to generating your own printer profiles for use with Qimage. If you are using profile generators such as our own Profile Prism or others like WiziWYG, Monaco EZ Color, etc. the following will help ensure that you get the most accurate color possible when printing with Qimage.
Even if you don't use Qimage and use another package to print, we would always recommend using the package that you will be using after the profiling to actually print the color targets for profiling. Simply "dumping" the printed target to the printer like most profiling packages allow is not recommended. You should be using the same printing tools on both ends otherwise more variables creep into the equation.
Context Sensitive Help: Remember, you can get help on any function in Qimage by holding the mouse pointer steady over that function for at least two seconds. To turn this feature on/off, click "Help", "Context Sensitive Help". Note that tool buttons always have their hints activated regardless of the context sensitive help setting.
CCD Noise Filters - Qimage provides filters specifically designed to remove anomalies associated with CCD's in digital cameras. These filters can easily be applied to one or all images in the queue by checking the box(es) found in the image editor window.
Dark current filter - Use this filter to remove unwanted "specks" of falsely-lit pixels from night shots or shots with long shutter duration. This filter needs no dark frame reference so it will work under any conditions.
Shadow noise filter - Use this filter to eliminate shadow noise found in most 2.0 or higher megapixel cameras. This filter will eliminate most 'background' or 'shadow' noise while maintaining a high level of sharpness.
High ISO noise filter - This adaptive filter works by comparing signal-to-noise ratio of each RGB channel and filtering each channel appropriately. Use when noise appears in an image (usually at high ISO values over 200).
D1 ISO noise filter - Specifically designed for the Nikon D1 digital camera, this filter will remove both banding noise and high frequency noise (dots) from images at high ISO. Note that this filter will ONLY work on original images (JPEG or TIF). This filter will NOT work if you have already modified the original image in any way (smoothing, despeckle, etc).
Dark frame subtraction - Use this filter to subtract hot pixels from long exposures. You may simply subtract dark frames from images, or interpolate hot pixels based on the dark frame. Try both options to see which works best for your shooting conditions. If you select a folder, Qimage will look through the entire folder until it finds an image that has the same camera model, shutter speed and ISO speed. If an match is found, the image is subtracted from the original. If no match is found, the filter is not performed and the original image is returned (without dark frame subtraction). If you select an individual image, that image will be subtracted from original(s) regardless of EXIF information match.
To access these filters, double click on any thumbnail or print to bring up the image in the image editor. The noise filters are located on the middle/right side of the window.
Image Comparator - Qimage can be used to compare two images side-by-side. Simply add two (or more) images to the queue and right click on the preview page and select "Comparator". If you have more than two images already in the queue, you can compare any two images by selecting the two images first. After right clicking on the preview page, select "Comparator" and Qimage will display the two images side-by-side.
The images are initially loaded at a 1:1 ratio (1 screen pixel = 1 image pixel) so that you can scroll both images to see details, however, by right clicking on either image, you can zoom in/out, rotate the image or brighten/darken the image(s). Note that this screen displays EXIF information above both images. Also be aware that the brighten and darken function are only available as an aid to assist in comparing the two images. Any filtering or editing should be performed first using the image editor.
To scroll the image when the image is larger than the display box, you can left click and drag the image with the "hand" or scroll using the scroll bars on the bottom and right of the image.
Useful image comparing tips:
Copyright/Signature (only available in Studio Edition) - Select an image on the preview page, right click, and choose "Copyright/Signature". Select a copyright/signature image and a location for the copyright/signature and Qimage will print the copyright/signature on the print at the identified locaiton. You may create a copyright of any size by using your photo editor and defining the image size (in inches or cm). Your copyright/signature will be stamped on the image at the size identified in the copyright/signature image. For example, if your copyright/signature image was defined as 1.5 inches across by .25 inches tall, your copyright/signature will be stamped at that size on all prints regardless of print size. The recommended resolution for copyright/signature images is 300 PPI. Since Qimage reads the embedded image size from your copyright/signature file, it is similar to using a "rubber stamp" on your desk to stamp the photos that you print.
Note that each copyright/signature image can have an associated mask that works similar to the masks used in Qimage cutouts. The difference is that with the copyright/signature mask, your mask is separate from your main image, giving you much more freedom. Your copyright mask should be the same file name with "-mask" appended to the file name. For example, if you choose "my copyright.tif", the associated mask should be "my copyright-mask.tif" in the same folder. The mask should contain a level of transparency from black (transparent or "all image") to white (translucent or "all copyright") or any value in between to give various levels of transparency from 0 to 255. You may open the copyright sample included with Qimage in your photo editor as an example. Note that copyright/signatures are normally stored in the "Signatures" folder under your Qimage install folder but Qimage will accept images from any accessible folder.
If you would like your copyright/signature to appear on each photo automatically whenever you add photos to the queue, you can select "Edit" from the Qimage main menu, "Preferences", "Automatic Signature/Copyright", and select "On". Once you select "On", the copyright/signature dialog will open and you can choose a file. Once you've chosen a copyright/signature file, that copyright will automatically be added to each print when adding images to the queue/preview page. To turn off the automatic copyright, simply use "Edit", "Preferences", "Automatic Signature/Copyright" and select "Off".
Cropping - You may have noticed that you sometimes cannot fit an entire picture within a "commonly used" frame. For example, there is no way to fit a 1600x1200 image into a 6x4 frame without cutting off (cropping) some of the image. You would normally do this by printing the image a little too large and trimming the edges that overlap the frame. Qimage can do this for you automatically and without wasting ink by printing larger than necessary. If the image fitting button (scissors icon) located on the "Print Properties" auto-popup panel is depressed, Qimage will crop out the middle of the photo, discarding a portion of either the top and bottom or left and right to force the image to fit in the size selected whenever necessary (when the image aspect ratio is different than your selected print size). In contrast, if the image fitting button is not depressed, Qimage will not crop any of the image. Instead, it will shrink the image so that the entire image fits in the frame selected, allowing some white border to show on the edges if necessary. It is important to note that the image fitting button located on the "Print Properties" panel applies to both new images being added to the queue and can also be used to change the image fitting of existing prints on the page.
Note that when "Crop to Size" is turned on (scissors button depressed), you have given Qimage permission to crop some of the image to force it to fill the entire frame. Qimage will automatically default to cropping out the exact center of the image. If you would like to crop a different section of the image instead of accepting the default center cropping, you can easily move the crop for each print using the cropping tool on the page editor (see example 3a in the Learn by Example section) or even create a multi-purpose crop that is placed on the image itself and applies to multiple print sizes (see example 11 in the Learn by Example section of the help).
The two types of cropping in Qimage
Print cropping - If you just want to adjust the crop for certain size prints, simply click the "Edit Page" button under the preview page on the main window and click on the "Cropping" tab on the right of the page editor window. Using the cropping tool in the page editor, you can visually adjust the portion of the image that gets printed. As an example, if you have selected a 5x7 print size and you have auto cropping turned on (scissors button on the main window is in the down position), Qimage will automatically crop out the center portion of your image to create prints that are exactly 5x7 inches in size. Sometimes the center may not be the best crop, however, so to adjust the area that is getting cropped, just use the cropping tool in the page editor and you can click on the small image in the cropping tool and drag it left, right, up, or down until it shows the portion you would like to include in your 5x7. You can also use the zoom lever to zoom in on an important part of the photo. Once you are done, Qimage will always remember the chosen crop/zoom for that particular image at the current size (5x7). In the future, each time you add that image to the queue at a size of 5x7 you will get the same crop, making it unnecessary to redo your crops each time you decide to reprint at the same size! Note that each time you choose a new size that you have not previously cropped (such as 4x6), Qimage will always default to a center crop and you can adjust from there as necessary. Since Qimage remembers your preferred crop for each print size separately, it is possible to fine tune all your crops for different sizes to look best at that given size.
Image cropping - Sometimes it is desirable to crop off certain portions of an image if you never want them included. For example, in a family photo, you may have a trash can on the left and an open door on the right. If you would like to crop the image so that the trash can and the open door never show and are effectively removed from the image, you can use the image editor to apply a crop to the image itself, placing your crop around the family members only, cutting off the superfluous objects on the left/right. To do this, we add an image to the queue and then double click on that image on the small preview page to open the image editor. The image editor will open and you can create a crop rectangle by clicking/dragging on the image from the upper left corner to the lower right corner. Once your "crop box" has been highlighted, move your cursor inside that box to black out all areas outside the crop so that you can see what the cropped image looks like. Once satisfied, click "Done" and then "OK" to associate this crop with the image. Note that when you associate a crop in this fashion, the original image has not been changed: Qimage simply saved information telling it to honor the crop each time the image is opened. As far as Qimage is concerned, the cropped area is now all that exists for this image (until/unless you delete the crop in the image editor). For convenience, note that Qimage allows you to click "Crop lock" and specify a certain aspect ratio for the crop. Clicking "Crop lock" and entering 4 and 3 next to the check box, for example, will ensure that your cropped area always matches a 4:3 or 3:4 aspect ratio.
Curves - The most common use of the curves filter is to change the contrast of different parts of an image. The following illustrates a common example for use of the levels filter in the image editor.
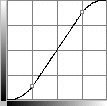
The thumbnail above represents an image with contrast that is a bit too low (left side of image). We can use the curves filter to create a typical contrast enhancing "S" curve which will darken the shadows and brighten the highlights. Instead of a straight line from bottom left to upper right which would indicate no change, we have grabbed a point on the graph about 1/4 from the left and dragged that point downward a bit. In addition, we grabbed a point about 3/4 from the left and dragged that upward to create the above "S" curve. The difference in contrast is visible with the original on the left side of the thumbnail above, and the increased contrast on the right. Notice that the gray haze caused be low contrast has been removed from the right/filtered side of the image.
Note that up to 17 individual points can be added to define the shape of the curve, so very complex curves can be created for other purposes. To add a new point to the curve, simply click in the area on the curve to reshape and drag up/down. To move an existing point, just click on that point and reposition it up/down. To remove a point from the curve, simply right click on that point. To see where a particular color in an image falls on the curves, click the dropper and then click on the image to place [red] points on the curves that correspond to the clicked area of the image.
With "lock all" checked, curves apply to all colors equally. You can uncheck "lock all" and apply different curves to individual colors by using the "Apply to" color at the bottom of the window. More information regarding general use of curves can be obtained via any Internet search tool using the keywords "image" and "curves".
Cutouts - Use cutouts to add a "scrapbook" effect to your printouts.
When an image is printed, it is normally printed as a rectangular print like the one below.
Cutting out a portion of the image can add personality to your prints. The "Oval" cutout was used on the print below.
Cutouts can also be used as a blending effect. The "Fade-oval" cutout was used on the print below.
Access: To use cutouts, you must apply the cutout to the image(s) using the image editor. As with all image edits that you choose to associate with originals, you are using a mask which is placed on top of the printed image. To use a particular cutout on an image::
That's it. The images will remain in the selected cutouts for both display (in the slide show) and on printouts until you remove the associated filter.
The Power of Cutouts!
Note that although some cutouts are provided with Qimage, there is no limit to the cutouts that you can design yourself. Cutouts are a very powerful feature and once you understand how they are created, you can create your own designs. The section below described how to create your own cutout designs.
The simple story: Cutouts are located in your Qimage folder under a subfolder named "cutouts". If you accepted the defaults when installing Qimage, your cutouts will all be located in the "c:\program files\qimage\cutouts" folder. To add a cutout to the list of available cutouts in Qimage, you need only create an image file (in any format) and copy it to the "c:\program files\qimage\cutouts" folder.
How to create a cutout image: To create a cutout, just use your favorite image editor and create a new image in 24 bit (16 million) color format. The image can be anything you like, however, Qimage treats all shades of pure gray as a transparency level: 0,0,0 is 100% transparent and 255,255,255 is opaque and will show as white on the printout. In other words, the original image will "show through" the cutout for any pixel in your cutout that has RGB value 0,0,0. A gray shade of 128,128,128 will show your image "half faded" to white. A value of 255,255,255 in your cutout will show as white in the resulting image (none of the original image will come through). All other shades of pure gray can be used to specify how much of the original image makes it through to the result, with 0,0,0 showing the original image and 255,255,255 having the original image completely "blocked" (white). Given this, if you look at the first oval cutout above, it is no more than an all white image with a circle in the center filled with RGB color (0,0,0). Why is the image above an oval cutout and not a circle? Because the cutout is always stretched first (distorted) so that it fits over the target image exactly. This is handy because if you look at the oval cutout supplied with Qimage (which is actually a circle), the top, bottom, left and right edges always touch the edge of your photo giving you the maximum possible area inside the oval! The second, faded oval, is a cutout with 0,0,0 near the center, fading through 1,1,1, 2,2,2, 3,3,3, etc to the edges where the 255,255,255 completely masks the original image.
The obvious question at this point is, "What if I want a shade of gray to appear as part of the image (in my cutout)"? You might want to do this if, for example, you want to add some black text in the white (masked) areas outside the oval above. Just remember that Qimage will only use RGB values as transparency masks if they are exactly equal in all three RGB channels. So, if you want black text, just set the color of your text to 0,0,1 instead of 0,0,0. Seeing that the blue value is 1, Qimage will not treat the text as a mask and the true color (0,0,1) will show on the cutout rather than the underlying image. Since the difference between 0,0,0 and 0,0,1 is negligible, no one will ever be able to tell that your text has 0.4% blue, and nearly all printers will print that color as completely black. Other shades of gray can be achieved in a similar fashion, for example, middle gray could be very closely approximated by using 128,128,129 instead of 128,128,128.
Complexity: It doesn't take long to realize that you can get pretty complex with your cutouts. Just be aware when creating new cutouts that they are always stretched to fit the image and THEN stretched again to fit on the paper. For this reason, always create cutouts of high enough resolution for the application. If you create a circle cutout that is only 50 x 50 in resolution, obviously the cutout itself will look jagged when printed (but the underlying image may not). Cutout resolutions of at least 1000 x 1000 are recommended.
Creating copyright "stamps" with cutouts: Using your photo editor, simply create an image that is filled with color RGB(0,0,0). Then, in the lower right corner (or wherever you like) add text at a different color (green, yellow, black, white, etc). For example, if you regularly work with images that are 2048 x 1536 resolution, create an image that is 2048 x 1536 that is filled with the color RGB(0,0,0). Then, in the lower right corner, if you want white text that says "Copyright 2003, Your Company Inc.", simply make sure the text color is 255,255,254. Save that image in your cutouts folder and apply it to a batch of images. When applied, you will see the copyright notice where you typed it. It's that simple! And remember, although you can associate the cutout as a filter to be applied to originals, you can also (with any filter) apply the filter to create new images so that the images can be used on the web, etc. To see an example of how professional you can get with copyright stamps, try the "copyright" cutout included with Qimage. This is a copyright "sample" cutout that will show you how to create semi-transparent effects in your copyright stamps!
Frames: cutouts that don't mask part of the image
You may wish to place a cutout around your images, ensuring that the entire image displays inside the cutout. Cutouts are normally used as a mask that is overlayed on the image, however, you can specify that you would like to use a cutout as a frame that surrounds your images by simply adding ".frame" in the cutout's file name. For example, a cutout showing a wood frame may be named wood.tif or wood.frame.tif. If the name of the cutout file is wood.tif, the frame will appear over your image, masking out part of the top, bottom, left, and right of the image. If, however, you change the file name to wood.frame.tif, Qimage will place your image in the center (black) rectangle and "shape" the frame around the image. Note that Qimage "detects" the inner black rectangle within the frame, so frames work best when you have a rectangular black area in the center of the cutout; odd shapes will not "fill" properly.
Fading to colors other than white
While neutral colors from 0,0,0 (transparent) to 255,255,255 (opaque) have special meaning in that they dictate the amount of transparency, it is possible to fade to colors other than white (the default fade color). Simply add the fade color enclosed in square brackets as part of the file name. For example, fade-oval.tif fades from transparent in the center to white at the edges. The same file with the name fade-oval[0,0,0].tif will fade to black at the edges instead of white. Naming the file fade-oval[0,255,0].tif will cause a fade to green at the edges, and so forth. Note that regardless of the fade color, 0,0,0 still indicates 100% image and 0% fade color and 255,255,255 indicates 0% image and 100% fade color. Also note that if you would like your prints to fade into the color set as the page background color, do not use the file name fade override as it will override the fade color without considering the page background color.
Dark Frame Subtraction - Used to remove "hot pixels" or to remove color/brightness bias from frames.
The dark frame subtraction filter serves three purposes, and therefore has three options:
(1) Simple subtraction: When taking long exposure shots of say 8 seconds or more, CCD's will normally produce visible specs of light in the image called "hot pixels". These hot pixels can deter from your image. The simple subtraction method of dark frame subtraction is to subtract a reference (black except for the hot pixels) frame from your original image, thereby subtracting the bright pixels from the original image. To do this, simply take a shot at the same exposure with identical camera settings and the lens cap on the camera. For example, if you take a 16 second shot of a night scene, simply put the lens cap on the camera and take another 16 second shot with all settings identical. The result of the second image is the dark frame: the only image "data" that it will have are the hot pixels. You can then subtract that second frame from the first (which contains your image). This is a common method of removing hot pixels and it normally works well since the exact same pixels are usually "hot" in every frame if the camera settings have not been changed.
(2) Hot pixel interpolation: In very long exposures such as 30 seconds or "bulb" exposures, pixels can be so "hot" that they clip. In other words, they can be too hot to subtract with good results because the hot pixel has "topped out" at maximum brightness in at least one of the color channels (a value of 255). The simple subtraction method doesn't work well in these cases because the hot pixels have maxed out and contain NO image data at all. As a result, when you subtract these pixels from your original image, the pixels will end up black or missing the red, green and/or blue channels resulting in dark (rather than bright) specs in your image. Using hot pixel interpolation, however, you can avoid this problem since hot pixels will be identified in the dark frame and interpolated using data around the hot pixels.
(3) Frame equalization: This is a new method that is not technically related to "dark" frames. Most imaging systems have some level of frame bias due to slight vignetting, electronic interference, etc. For example, many have noticed a very slight green cast toward the left of all images using the Fuji S1 camera due to some internal electronic interference. In addition, even on the most expensive lens and camera systems, most lenses do not pass an equal amount of light in the center of the image when compared to the edges. This is a well known and normal aberration of lenses called vignetting and can be seen in images as a darkening at the edges of the picture or darkened corners. Fortunately, effects like these are normally consistent from shot to shot, at least when using similar focal lengths (zooms). Frame equalization allows you to completely remove these effects by using a single test shot to remove any color/brightness bias across the image. Note that this will NOT work to remove fringing since fringing is based on chromatic aberration and depends on image content. To use this feature, simply take a shot of a white piece of paper where the paper is evenly illuminated and covers the ENTIRE picture. Take the picture slightly out of focus and make sure that the paper is smooth with no specs or other discoloring. Use an uncompressed (TIF) mode if possible and turn camera sharpening OFF for the shot. This becomes your frame equalization reference. It is not necessary that the paper be exactly white or even that white balance is perfect, only that the shot is not over or underexposed. If the shooting conditions are as prescribed, the resulting image should be a frame of one smooth color that covers all areas of the image. In other words, the RGB values across the image should be relatively the same. You will probably notice, however, that due to inefficiencies in the camera and/or lens system, that the color is not smooth across the entire frame. The corners may be slightly darker than the center, etc. When you use the frame equalization filter, Qimage will use this reference frame to "reverse" the bias in the image to produce a smooth, evenly lit scene.
NOTE: In all three methods above, Qimage allows you to select a folder rather than a single image to subtract. If you supply a folder of images rather than an individual image to subtract, Qimage will look through the folder and select (based on EXIF information) the image that matches the closest to the original in exposure time, ISO speed, resolution, etc. Using this feature, you can create a folder of dark frames at different exposures such as 2 seconds, 4 seconds, 8 seconds, etc. This allows you to take all of your dark frames once and refer to them later without the need to take the dark frames in the field as you go.
Default size - identifies the default print size to be used when adding images to the queue without specifying a size (without clicking the size dropdown to select a size).
Delete Filters - Qimage offers a quick way to remove associative filters (image edits) and revert to the original image. To quickly remove associative edits from images, simply select one or more thumbnails or prints and then right click and select "Delete Filters".
Mark Edges - Click the "Job Properties" tab on the bottom/right of the main window and check "Edges" to produce crop marks or a thin outline around each print to aid cutting.
The two options below produce lines that extend past the edge of prints to aid cutting. Be aware that since crop marks and guide lines extend beyond the edges of prints and into "unused" portions of the paper, they should not be used if you intend to reuse/refeed the paper into the printer at a later time in order to use more of the paper.
* Note: crop marks and guide lines will not print on corners/edges that are too close to the printable margins of the paper. Unless borderless printing is selected, your printer will not be able to extend the crop marks/guide lines all the way to the edge of the paper due to physical printer limitations.
The remaining four options produce hairline borders on the edge/corners of prints. Since these options produce lines that do not extend beyond the edge of existing prints, they do not use more paper unlike crop marks and guide lines above.
Edit Images - The image editor can be accessed via double clicking on a thumbnail or a print on the preview page.
You may edit your images by changing the filter parameters on the right side of the window. To assist in the design of your filter, the following functions are available within the image editor window:
To access the Full Page Editor, click the "Edit Page" button under the preview page on the main window.
All - apply selected bounds to all images in the queue (document).
Bounds - size of the selected print(s). See "Defaults" under main screen functions for more info.
Click/Drag - click and drag any corner of the selected image to resize the image visually. Click and drag the center of the image to move the image visually (will set image positioning to "Freehand" mode automatically).
Cropping Tool - click/drag the image in the crop window (accessed via the "Cropping" tab) to adjust the location of the crop. Note that Qimage automatically remembers the crop you prefer for each image based on the aspect ratio of the print so once you identify your preferred crop for a 4x6 print of a certain image, Qimage will honor that crop every time you add that same image at a size of 4x6, 3x2, 8x12, etc.. If you specify a different crop for an 8x10 size of the same image (since that is a different aspect ratio), that crop will be honored for 8x10, 5x4, 16x20, etc.
Details - click details to view embedded image information such as shutter speed, flash, zoom, etc.
Go To - select a page and the page editor will display that page.
HQ Preview - click the HQ Preview button to refine the view of the current page (high resolution print preview) - applicable unless you are already using "All Images" under "View" (see below).
Location - enter a specific location on the page based on distance from the left, right, top, and bottom edges of the paper.
Print Page - click this button to print only the page being viewed. Return to the main menu if you would like to print the entire document.
Right Click - right click on the page to activate a list of functions that apply to the selected image on the page, including text annotations, copy/cut/paste, etc.
Selected - apply the selected bounds to the highlighted image only.
Soft Proof - simulate the color of the current page when printed with the current printer ICC profile (both Mntr ICC and Prtr ICC must be enabled).
Swap - rotate the "picture frame" (bounds) 90 degrees. The effect of this function depends on the "Image Fitting" function (see main screen functions).
View - select the level of detail desired on the page preview.
Select "Selected Image" if you wish to show the actual image only for the highlighted image.
Select "Cached/Small Images" to load images only if they can be loaded quickly.
Select "All Images" to view all images on the page (slowest). The "All Images" option will show you exactly what your printout will look like.
Edit IPTC Image Info - Qimage allows you to enter IPTC data such as a title, author, copyright, etc. to be stored in the image file. To edit/add IPTC information to an image, simply select image(s) from the thumbnail grid and then right click in the thumbnail grid and select "Edit IPTC Image Info". You can then edit the available IPTC data fields and save the information to images as you go. Note that IPTC information can only be added to JPEG/TIFF files.
E-mailing photos - Typically, most of your photos will be high resolution original images straight from your camera. Since these are maximum quality images intended for optimal display/printing, they are generally larger than necessary for the purpose of e-mailing snapshots. To avoid sending very large attachments which can cause long download times for the recipient, Qimage provides a method of downsampling (reducing the size of) photos prior to sending via e-mail. If you would like to send some photos from your digital camera to others, first use the Qimage file browser to locate a folder that contains your photos. Then select the photos and right click in the thumbnail grid, select "Send via E-mail", and choose a size (resolution). You may wish to refer to example 12 for more detailed instructions.
Qimage's {Q}e-mail work folders:
Whether you are using "Send via E-mail" from the thumbnail grid or "Create E-mail/Web Copies" from the queue, Qimage will create/use a folder named {Q}e-mail. This folder will appear as a subfolder under the current folder (the folder where thumbnails are being displayed). The "{Q}e-mail" folder should be considered a "scratch" or temporary folder since the {Q}e-mail folder is cleared each time the "Send via E-mail" and "Create E-mail/Web Copies" function is used. If you would like to keep the new e-mail/web images created by Qimage rather than just creating temporary/scratch copies for sending via e-mail, you should copy/move the files from the {Q}e-mail folder to another folder to ensure that they will not be erased the next time you use the e-mail/web functions.
Note regarding invoking e-mail clients from Qimage:
Qimage uses MAPI (Message Application Programming Interface) to invoke your e-mail client. Unfortunately MAPI is "hardwired" for Microsoft products and most non Microsoft mail clients do not fully support the MAPI spec. As a result, if you use a non Microsoft mail client, Qimage may not be able to fully automate composing a new e-mail with images attached. If Qimage runs into a problem and detects that your mail client is not responding properly to MAPI commands, it will open your default mail client with a new message ready to be sent but without the images attached. A secondary "Explorer" window will open showing the location of the images in question so that you can manually drag images (files) from the explorer window to your mail message's "attachment" tab and then send the message.
If you are using a non Microsoft mail client and you are having trouble with Qimage invoking e-mail, you may wish to install MS Outlook or Outlook Express just to allow them to set themselves as the default mail client. By allowing MS Outlook/Outlook Express to be your default mail client, you can still use your non Microsoft mail client for all your typical e-mail tasks while regaining MAPI compatibility for programs that "spawn" e-mail tasks.
Qimage also offers the ability to send email directly. See "Edit", "Preferences", "Mail Sending Options" to set up parameters such as your outgoing (SMTP) server, incoming mail server, etc.
EXIF Hotbar - The EXIF hotbar automatically shows image information on the lower status bar of the main screen as you pass the mouse pointer over images. This allows you to quickly examine f-stop, shutter speed, etc. instantly. Note: if you have images that are corrupted or unreadable, you may want to turn this feature off so that Qimage does not try to examine each file as you pass the mouse pointer over the thumbnails. To turn the EXIF Hotbar on/off, click "Edit", "Preferences", "EXIF Hotbar" from the main screen.
EXIF and other image information - Any embedded image information (exposure info, f-stop, etc) can be displayed in the following ways:
Exposure Compensation - This filter brightens underexposed images by expanding the dynamic range of the image.
To access this filter, double click on any thumbnail or print to open the image editor and then check the "Exposure" box to add the exposure filter and then click "Done".
File - The "File" menu contains functions related to file operations like recalling/saving jobs or settings and also contains print related functions.
Recall: This function should be used to recall Qimage settings. Anything from just the main window setup to an entire job including images in the queue can be recalled.
Save: This function should be used to save Qimage settings. Anything from just the main window setup to an entire job including images in the queue can be saved.
Flash Card Copy/Move: Use this function to download images from a flash card in a card reader attached to your computer.
Import via Twain: This function can be used to import a scan from a scanner or an image from a digital camera that is tethered directly to the computer.
Print To: Use this function to select whether you would like to print directly to a printer or to image files.
Page/Printer Setup: This function is used to access the print driver settings that control things like paper size, type, print quality, etc. or to set up the page for print-to-file.
Print: Use this function to print the images in the queue (on the preview pages). You may print all pages or just a range of pages.
Open Automated Job Log: Qimage keeps a record of jobs when they are printed. Use this function to view/recall a previous print job.
Exit Without Saving Settings: Use this function to exit Qimage without saving program settings such as the current folder, main window size, current print size, etc.
Exit: Use this function to exit Qimage normally: all settings in Qimage will be saved and recalled the next time you use Qimage.
Filters (Managing Associative Filters) - Methods for managing the filters that you have associated with images.
Qimage offers a number of methods to help identify which images have been edited and have associated filters, view/edit/modify those filters, and remove filters associations.
Flash Card Copy/Move - This function transfers images from your camera's memory card to your PC's hard drive (or other drive location).
The Flash Card Copy/Move main window
The main window is split into two main sections:
- The source panel: The source panel (top half of the main window) shows the files that exist on the flash card that is currently inserted into your computer or card reader. When Qimage Ultimate is first installed, it is set to recognize flash cards whenever a flash card is inserted and close when the flash card is removed. This behavior can be changed in "Edit", "Settings" on the Flash Card Copy/Move dialog. Note that you can also click on the light blue header labeled "Source" to manually select a source location. Note that the information displayed in the source panel is for reference only: you do not need to do anything in that area although you can double click on folders there to open an explorer window to browse contents if you like.
- The operations panel: the operations panel is where you define which operations are to take place. Files can be copied or moved to one or multiple locations. Note that photos are being copied to two different locations while videos and other files are moved to just one location. The operations here are quite flexible and allow copying/moving files to many different locations in one operation including multiple drives or even different computers on a network! Note that by default, Flash Card Copy/Move is set up so that you can select a "To Folder" of your choice where most of your images reside and a "Subfolder" of that "To Folder" is created based on today's date. These options are configurable of course, but this setup facilitates the "one click and done" feature described below.
Features
One click and done!
Once you define the operations that you normally perform on flash cards, Qimage will remember those operations from that point forward. By default, Qimage is find your flash card automatically so that when one is inserted, the "source panel" will populate automatically, showing the files on the card. At that point (and after you've set up your desired copy/move commands the first time), you can click the "Go" button and you are done! If move commands are used, the card will be cleared of all data and not only will the data be copied to the specified locations, but the card will also be cleared and is ready to place back in the camera for a new batch of shots. Of course, there are many options to allow users to customize how they transfer or "pipe" data to different places from their flash cards so see the settings section below for more information.
"Pipe" your photos and videos to multiple locations with a single click
No need to open explorer windows, copy, and paste. Qimage's Flash Card Copy/Move function allows you to define as many destinations for your photos and videos as you like. Have a network and need to put photos on 10 machines? No problem. Just like to keep a backup copy in a second folder? Easily done. Simply define each operation in the operation table.
Quick verification
Any "move" operation actually consists of two separate operations: first the file is copied and then the source file is deleted leaving only the new (target) file. Flash Card Copy/Move actually verifies the existence of the target file and the file size to verify that the copy operation was successful prior to deleting the source during "move" operations so your data is safe!
Settings
Program Options
Automatically insert today's date in the operation table subfolder (default=checked): Check this option if you would like to create a subfolder based on today's date. If your "To Folder" in the operation table is "c:\photos" for example and today's date is 9/6/2009, the subfolder will be 2009-09-06 and files will be copied/moved to c:\photos\2009-09-06. Flash Card Copy/Move is set this way by default to facilitate "click once and done". With this option turned on, you can add other text to the subfolder if you wish. For example, you can change the subfolder from "2009-09-06" to "2009-09-06-birthday" if you wish, but the date must be some part of the subfolder name. If you'd rather pick your base photo folder in the "To Folder" and manually type the subfolder name each time, just uncheck this box. If this box is unchecked, you can also leave subfolder blank and simply choose the destination folder in the "To Folder" entry. In other words, if you want to select a destination folder manually each time, just uncheck this option and make sure all "Subfolder" entries are blank in your operations table.
Automatically rename photos by date (default=unchecked): Check this option if you would like destination photos to be renamed based on date or your user defined custom renaming criteria (click the "Auto Rename Options" button to define). As an example, _MG_0001.JPG would be renamed to something like "2009-08-06 19.32.32.JPG" in the destination location(s).
Automatically rename videos by date (default=unchecked): Check this option if you would like destination videos to be renamed based on date or your user defined custom renaming criteria (click the "Auto Rename Options" button to define). As an example, 00001.MTS would be renamed to something like "2009-08-06 19.32.32.MTS" in the destination location(s).
Check availability of destination folders on startup (default=unchecked): Check this option if you would like Flash Card Copy/Move to make sure all the destination folders in the operations table are available when the program first starts. All folders that are not available such as folders on an unavailable PC on a network or on a removable drive that is not inserted will be highlighted in the operations grid. This option defaults to off (unchecked) because Flash Card Copy/Move will make this check every time you click the "Go" button anyway to ensure that all destinations are available.
Monitor these drives for photos/videos (default=all removable media drives checked): By default, Flash Card Copy/Move will check all drives that are labeled as removable media drives on your system so that it can find any type of flash card inserted into your computer or a card reader connected to your computer. Most systems with built in card readers use various drive letters for different types of media. A compact flash card might show up as the "I:\" drive while SecureData cards might show on drive "K:\". If you have specialized removable drives, you can tell Flash Card Copy/Move not to check certain drives for inserted media. For example, your drive H: might be an old ZIP drive so you might want to uncheck the H: drive in the list if Flash Card Copy/Move keeps opening and thinking there are photos on that drive. In most situations, you will not have to uncheck any drives
Raw Photos and Miscellaneous Files: The settings in the "Raw Photos" panel and "Miscellaneous Files" panel control how raw photos and non photo/video files on your flash cards are handled. By default, Flash Card Copy/Move has all checkboxes checked which tells the system to copy raw photos into a separate subfolder named "Raw" and to develop them in a separate "Developed" folder. Let's look at an example based on the default settings. Let's assume your "To Folder" in your operations table is "c:\photos" and your "Subfolder" is today's date which is 2009-09-06. Let's also assume that you have some JPG files/photos on the flash card and some raw files as well. In this example, a "Copy", "Photos" operation would copy files to these destinations:
- c:\photos\2009-09-06: your JPG photos will be transferred here.
- c:\photos\2009-09-06\Raw: your raw photos will be transferred here.
- c:\photos\2009-09-06\Developed: your raw photos will be developed into this folder.
- c:\photos\2009-09-06\Misc: all files on your flash card that are not photos or videos will be transferred here.
Floating Text - You can add text to any part of an existing page, including on top of existing photos. To access this feature, locate an existing page by browsing through the pages in the queue using the preview page on the main window. Then click the "Edit Page" button below the preview page to go to the full page editor. Once the page is opened in the full page editor, you can add text to the page by clicking the small "A" button on the right side of the window or by right clicking on the page and selecting "Floating Text" from the menu. Then simply move over to the page and click in the location where you want the text placed. The following outlines some of the options available when placing text on a page in Qimage.
Folder History - Allows you to quickly navigate to any of the last 16 folders used in Qimage. To access the folder history, simply drop down the combo box located above the thumbnail grid. Note that you may add/remove folders from this list manually by first selecting the folder so that it is the current folder selected in the history drop down, and then right clicking on the arrow on the right side of the drop down box to add/remove that folder from the history list.
Notes on Freehand placement of images on the page
To gain maximum control over the printed page, you may click/drag
images on a page even if you are using an automatic placement
option such as "Center" or "Optimal". Prints
can be resized on the preview page by clicking one of the four
corners and dragging to size. Prints can be moved to a specific
location on the page by clicking the center of the print and
dragging the print to the new location. For higher precision
sizing/moving, use the
![]() Edit Page button to open the Full Page Editor. Note
that once you drag a print to manually place that image on the
page, the page you are working on will switch to "Freehand"
placement mode as indicated by the small "F" button at
the top/right of the previewed page being down/depressed. For
example, if you are working in "Center" placement mode
and have three pages in the queue, manually moving a print on
page two will result in page two switching to "Freehand"
placement while pages one and three remain in "Center"
placement mode (as will any new pages added later). To return a
page to the current (document) placement setting and remove the
"Freehand" flag, simply click the small "F"
button at the upper/right of the previewed page and return it to
the "up" position.
Edit Page button to open the Full Page Editor. Note
that once you drag a print to manually place that image on the
page, the page you are working on will switch to "Freehand"
placement mode as indicated by the small "F" button at
the top/right of the previewed page being down/depressed. For
example, if you are working in "Center" placement mode
and have three pages in the queue, manually moving a print on
page two will result in page two switching to "Freehand"
placement while pages one and three remain in "Center"
placement mode (as will any new pages added later). To return a
page to the current (document) placement setting and remove the
"Freehand" flag, simply click the small "F"
button at the upper/right of the previewed page and return it to
the "up" position.
Note that you can set the entire document to "Freehand"
placement at any time as well, which will prevent Qimage from
auto-arranging prints altogether. The Freehand option
"locks" the positioning of every image in your document
so that they will not be moved automatically. If the entire
document is set to "Freehand" placement mode (![]() "Freehand"
is selected in the placement tool button below the preview page), you can add
images to the page by clicking/dragging thumbnails and dropping
them in their initial location on the preview page. The same
click/drag-to-add method can be used on individual pages flagged
as "Freehand". To move prints after their initial/rough
placement on the preview page, you can simply click the center of
the print and drag it to a new location on the page or use the
"Freehand"
is selected in the placement tool button below the preview page), you can add
images to the page by clicking/dragging thumbnails and dropping
them in their initial location on the preview page. The same
click/drag-to-add method can be used on individual pages flagged
as "Freehand". To move prints after their initial/rough
placement on the preview page, you can simply click the center of
the print and drag it to a new location on the page or use the
![]() Edit Page button to access the Full
Page Editor where you can drag
the image in higher precision.
Edit Page button to access the Full
Page Editor where you can drag
the image in higher precision.
Moving and sizing in the full page editor:
Once a rough placement/sizing has been established on the preview page on the main window, you can refine the exact location and size of prints using the Full Page Editor which has additional functions to help place/size images. Just click the
Edit Page button to open the current page in the Full Page Editor. While prints can be moved/resized by clicking and dragging with the mouse, you may also select a print on the page and manually enter a new size in the size boxes on the right of the window to specify exact sizes. In addition, you may select an exact location for your print on the page by changing the location values under "Location" on the right of the window (if the "Cropping" tab is depressed, click "Size/Loc." to see the size and location parameters). For example, if you would like the image to be located 2 inches from the top of the paper, enter a "2" in the top location box. If you want that image to be 3 inches from the right edge of the paper, simply enter a "3" in the right location box. You may also "nudge" the prints by first selecting the print and then using the arrow keys to nudge the print left/right/up/down. Use the Ctrl key in combination with the left/right/up/down keys to nudge the print to the next nearest edge of other prints on the page for a quick and easy way to align a print with other prints. Use the Shift key in combination with the left/right/up/down keys to nudge the print to the next nearest 0.1 inch increment. Finally, to "snap" any print to the nearest 1/10 inch, simply right click on that print and select "Snap to grid".
Here are some useful tips for using "Freehand" placement:
Fringing Filter - This filter removes or drastically reduces green/purple color fringing found in many 2.0+ MP digital cameras. The filter is designed to remove chromatic aberration of lenses, normally seen as a green or purple fringe around objects near the edge of photos. This filter will work well on most fringing, however, it is not designed to remove purple "halos" caused by intense light or overexposure (highlight blowouts).
To access the fringing filter, double click on a thumbnail or print on the preview page to open that image in the image editor. Check the box for "Fringing" under "Auto Correct" and then click "Done" and "OK" to associate the filter with the original image.
Full Screen View - Right click on a thumbnail in the thumbnail view. When the popup menu appears, select "Display Full Screen". Note that this option displays only the thumbnail under the mouse pointer (to view multiple images full screen, use the slide show by right clicking on the preview page). Pressing the space bar while holding the mouse over a thumbnail will perform the same function.
Note: to return to the main window, simply press the Esc key.
Global Filter - Qimage filters can be set as "global filters" without editing individual images. If you set a filter as a global filter, all images loaded by Qimage will be filtered automatically by the global filter (unless the images already contain their own individual filters). For example, you might have a lot of dark images taken without flash. You could set the exposure correction filter globally and all images will pass through the filter prior to all display operations AND prior to all print operations.
To set a global filter - Double click on any thumbnail or print to open that image in the image editor. Set up your filter any way you like and click "File" and "Save Current Parameters to File" on the top menu bar. Use a file name that describes your filter such as "exposure filter". Close the image editor window, return to the Qimage main window and check the "G.Filter" box on the bottom right of the window on the "Job Properties" tab. Pick "Select Global Filter" from the popup and open the filter file that you saved from the image editor: your global filter is now active. Any and all images accessed will pass through this filter. Important: individually assigned filters override the global filter, so if you have images that have filters associated with the individual image file, the individual filter will override the global filter. To remove filters associated with individual files, just add the file(s) to the queue, select all the images in the queue and then right click in the queue and select "Delete Filters".
To deactivate the global filter, simply uncheck "G.Filter" on the main window.
If G.Filter is checked, simply hold the mouse pointer over the G.Filter box for two seconds and the name of the currently active global filter will be displayed.
If G.Filter is unchecked, check the G.Filter box and the global filter last used will be listed at the top of the pop up window.
High Quality Work Image - The "High Quality Work Image" option is located in the image editor window under "View". If enabled, Qimage will display the main/large image using high quality sizing methods to ensure a high quality image at the size displayed on screen. If disabled, Qimage will display the work image using a much faster resizing that will result in faster display updates, however, some "jaggies" may be noticed while using the faster display. Note that this option only affects the quality of the image displayed while you are working in the image editor window, and has no effect on the quality of the actual filters or the filtered/saved image(s).
Hyper Processing - Hyper processing makes the most of your dual/quad core system by utilizing all available processors (up to four cores). On a dual or quad core system, printing speed and thumbnail building speed can be significantly improved by turning on hyper printing and hyper thumbing. When you first installed Qimage Ultimate, the best settings should have automatically been selected based on your system configuration at the time. When making selections manually, if your system has two or more cores (processors), turn quad core printing on as quad core printing works well on either dual or quad (or more) core systems. Since thumbnail building is more memory intensive, only select the setting that matches your system: turn on dual core thumbnail building or quad core thumbnail building based on your system configuration. If you'd like to be sure you've selected the proper setting, click "Help", "Analyze Current Settings" from the main menu in Qimage. If you've made the right selections, you'll get no conflicts. If there is a better choice, Qimage will notify you.
Image Fitting: Depending on the resolution of your images (whether scanned or from a digital camera), your images may not fit into "common" frame sizes like 5 x 7 because the aspect ratio of your images is different from that of the frame. For example, a 1600 x 1200 resolution image has an aspect ratio of 4:3. Since a 7 x 5 picture frame has a different ratio, namely 7:5, your 4:3 image must be modified in one of two ways so that it fits in a 7 x 5 frame. Qimage supports both of the following methods for sizing/fitting images:
Image Lock: Turning on the image lock (lock button under the preview page) will ensure that images appear in their original orientation (the orientation shown in the thumbnail area). The prints will not be rotated unless rotation is unavoidable due to the fact that the image is too big to fit on a page in its original orientation. For example, if you add a portrait thumbnail to the queue at a size of 8x10 and you are using a landscape 10x8 paper orientation, the only way to fit the image on the page is to rotate it, so in this case, Qimage will override the lock. Note that for the image lock to be effective, the lock button must be depressed before adding images to the queue. Turning the image lock on (locked icon) can be useful if you do not plan to cut your images from the page but would rather all your image appear upright on the page. As a general rule, if you normally cut your prints off the page, leave the image lock icon unlocked. If you do not plan to cut the prints from the page, but prefer to simply insert printed pages into an album, it may be better to lock your images so that they get added to the printout in their original (upright) orientation and do not get rotated to fit the size you selected.
Note: Adding images to the queue with image lock on simply ensures that the initial print orientation is upright on the current page. Once you have added images to the page, you may take manual control of print orientation by selecting print(s) and then clicking one of the orientation buttons on the "Print Properties" auto-popup panel on the main window. Also note that if you are using "Optimal" image placement, turning the image lock on will allow you to manually control (and lock) the orientation of your prints while still optimizing printed space given the current orientation of prints. Turning image lock off while in "Optimal" image placement mode returns control of print orientation to Qimage so that print space may be fully optimized.
Image Placement - defines how the images are paginated (placed) on each page. To select an image placement method, use the placement tool button under the page editor and select a placement method.
Optimal - Optimal image placement is the default when you first start Qimage. It ensures that the least amount of paper is used by taking control of the orientation (portrait/landscape) of prints and filling "gaps" on each page. Use this option if paper usage is more important than the order and orientation in which images are printed. It is best to use the Sort Prints button just before printing so that prints will be collated and will be easier to cut from the printed page. Note that to obtain truly optimal use of paper, the "Image Lock" button (lock icon below the preview page on the main window) must be in the up/unlocked position. If "Image Lock" is on, you have told Qimage that it does not have permission to alter the orientation of prints (portrait/landscape) on the page in order to obtain the best use of paper. Note that if you are saving sessions where placement of images/text must be the same each time you load the session in the future, use of one of the other placement options is recommended since placement of prints/text may change from one version to the next as the optimal and optimal/spaced methods are improved from time to time.
Optimal/spaced - The "Optimal/spaced" placement method is the same as "Optimal" above, however, prints are spaced as far away from each other as possible given the available slack on the page rather than directly next to one another as with "Optimal" placement. Note that space can only be inserted between prints if there is leftover room on the page that is not being utilized. For example, if the printable area of your page (listed above the preview page) is exactly 8.0 x 10.0 inches and you place four 4x5 prints on the page, there will be no space between prints and "Optimal/spaced" placement will be identical to "Optimal" placement in this case due to the fact that four 4x5 prints use up the entire 8.0 x 10.0 page. "Optimal/spaced" placement should be used when you would like to ensure the highest paper savings while inserting space between prints only if space is available. If you require that a certain amount of space appear between prints, it is more appropriate to use the Border function to accomplish "hard spacing". Note that if you are saving sessions where placement of images/text must be the same each time you load the session in the future, use of one of the other placement options is recommended since placement of prints/text may change from one version to the next as the optimal and optimal/spaced methods are improved from time to time.
Compact - use the compact option to fit all images as close together as possible in the upper left corner of the document. This option is useful if you want to use the absolute minimum amount of paper so that the unused portions may be used later.
Center - the center option will result in the same number of images per page as the compact option, except the images will be centered on the page and spaced apart so that images do not look crowded. This option is most useful for creating picture albums. For an understanding of the different centering methods (physical centering on the page and centering within the printer's printable area), see the Margins help page.
Manual - the manual option allows you to enter a position (upper left corner) on the page for each image to print. Note that since you are identifying a location on the page, only one image will print per page. This option can be useful for locating an image over other (non-blank) media such as greeting cards, etc.
Template - the template option places each image at a predefined location on the page (grid). The template option is useful for contact sheets or other applications where images need to be placed withing predefined rows/columns.
Template/centered - same as template above, however, images are centered within each template cell instead of upper/left justified.
Freehand - Allows total control over where images are placed on the page. In this mode, you MUST take manual control and place all images on the page yourself. You can start with one of the other (automatic) options and switch to freehand placement later to "tweak" your printout manually. See the Freehand option for more details.
Instaview - Qimage provides a very handy feature called "Instaview" that can be used to access a larger view of images in the thumbnail grid, preview page, or queue. Simply move your mouse pointer over a thumbnail in the thumbnail grid, a file name in the queue, or a print on the preview page and then press and hold your middle mouse button, press and hold down on your mouse scroll wheel, or press and hold the <enter> key on the keyboard. Any of these three methods will display the Instaview window for as long as you are holding the button/key. Release the button/key and the Instaview window will disappear. The Instaview window displays a medium size preview of the image along with some useful data about the image. Note that the size of the image is related to the thumbnail quality chosen under "Edit", "Preferences", "Thumbnail Quality" so the higher you set your thumbnail quality, the larger the Instaview preview image. Also note that like the "display full screen" function accessed by the spacebar, Instaview displays the image and information related to the object currently under the mouse cursor, not selected items. Because Instaview displays information for the object under the mouse pointer, it does not disrupt or change image/file/print selections so you can use this feature to do things like instantly expand thumbnails to a larger size to preview them while browsing through and selecting thumbnails from the thumbnail grid.
Info Stamp - Stamps selected information directly on image(s). Choose from a variety of general info or EXIF info. Simply select the information that you want stamped on the image(s), the location of the info, and the font attributes and Qimage will stamp this information directly on the image. As with all other filters, the info stamp can be "stuck to" the image in an associative way so that the original is untouched or you can create new versions with the stamped information added in directly in the image.
To access info stamp, double click on a thumbnail or print to open the image editor. The "Info Stamp" checkbox is located in the image editor under "Image Effects". When you check the info stamp checkbox, more options will appear. When finished, simply click "Done" and then "OK" to associate the stamp with the image.
Interface - Options that control the appearance and functionality of the main window interface can be found under "Edit", "Preferences" at the top of the main window.
Levels - Access the levels filter by double clicking a thumbnail or print to open that image in the image editor. The "Levels" tab is at the top of the window on the right. The most common use of the levels filter is to redefine black and white points in an image to correct under or overexposure. The levels filter can be used to redefine minimum and maximum brightness for the luminance channel (RGB), or individual color channels separately. The following illustrates a common example for use of the levels filter.
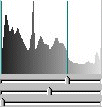
The thumbnail above represents an image that has been underexposed (left part of image) due to light entering a stained glass window in the background. The histogram on the right shows that the brightness of pixels in the photograph is well distributed from dark to bright, however, the camera metered the scene too dark for our main subjects due to the bright window. Since we do not care about detail in the stained glass window as it is not our main subject, we can use the levels filter to expose the image properly for our main subject. Looking at the histogram, the peak in the graph on the right side is caused by bright pixels in the window, so we slide the highlight (top) slider to the left until we reach the next peak in the graph which in this case represents the white shirt. Moving the highlight slider to this location redefines the shirt as the brightest object in the photo while maintaining detail in that area. Since we have "clipped" the right part of the graph, note that some detail in the bright window will be lost as a result. The difference can be seen in the thumbnail (left side underexposed, right side exposed to retain detail in the white shirt). Note that we could go even further if we are not particularly interested in detail captured in the white shirt, and expose more for the faces in the photo by continuing to drag the highlight slider further to the left. In addition to brightening the highlights in an image, we can also darken the shadows by sliding the shadow (bottom) slider to the right in a similar fashion. The middle slider is the midtone/gamma slider and is used less often. The midtone slider changes the shape of the brightness curve to achieve a non-linear brightening/darkening effect. We would use the midtone slider to bring more detail out in the shadows without affecting the highlights for example.
While the above represents a very common use of the levels filter, some very complex issues can be addressed with this filter as well since it allows adjustment of individual color channels as well as simple brightness/luminance adjustments. It is possible to remove color casts or change the overall tone of the image for example. If you would like more information, we suggest using any Internet search tool to search for the words "image" and "levels" since there is an abundance of information available on this powerful tool.
Lossless JPEG Transformations - You can apply transformations to JPEG format files without any loss of image quality. To perform lossless transformations, add the image(s) to the queue and then double click on an image on the preview page to open the image editor. When the image editor appears, simply click "Lossless JPEG Xforms" from the top menubar. Select the appropriate transform from the drop down menu and you will be prompted to overwrite the originals or create new images. Click "Ok" after selecting "Create New Images" or "Overwrite images" and the new JPEG images will be saved.
Note: EXIF information is also preserved after a JPEG transformation.
Margins - to select new margins for the printed page, click "Edit", "Preferences", "Print and Page Formatting", "Page Margins" from the main menu. For each margin (left, right, top, and bottom), three parameters are shown:
Using margins to control image centering in Qimage
A note about physical centering of prints and print driver settings:
Note that many printers offer the ability to set up your paper for borderless prints, or prints with "no margins". If you find that the size of the largest possible print has reduced when you use the second option above, or that you have lost the ability to print a certain number of prints on a page, you can often modify the printable area using "File", "Printer Setup" to achieve larger print areas by selecting "borderless", "no margins", or "maximum" printable area. Pay attention to warnings generated by the print driver when modifying printable area, however, because print quality can begin to deteriorate when making changes to the printable area. An example of the effect of the above two centering options on print size would be the following. Suppose you were able to print an 8 x 10 under option 1 above, but using option 2, the largest print size possible is 8 x 9.9. Instead of sacrificing print quality by setting your printer to borderless mode, you may just wish to reduce the size of your print from 8 x 10 to 8 x 9.9 so that it will fit on the page and allow physical centering. Again, note that the reduced print size available to you when physically centering prints is a limitation of the printer, not a limitation of Qimage.
Manually forcing a print to the center of the page in "Freehand" placement mode:
Instead of using margins to force all prints to the center of all pages, you may wish to force an individual print to the center of the physical page. To do this, open the page editor using the "Edit Page" button under the preview page, select the print, and then click the "Center" button on the right side of the window under the "Location" group. Use of this "Center" button will force the selected print to the center of the page (if possible) but will not affect placement of other images in the queue.
Mirror - The mirror option can be used to mirror images for the purpose of printing transfers for tee-shirts, etc. To mirror an image, double click on a thumbnail or print on the preview page to open that image in the image editor. Check the "Mirror" box and then click "Done" and "OK" to associate the mirror filter with the original image.
New Session w/Selected - Select one or more images on the preview page and right click on the preview page and select "New Session w/Selected" to clear the queue and start a new session with only the selected images in the queue. This function is useful when making selections from a prior (saved) session. For example, after printing a contact sheet and saving the session for that contact sheet, you can go back and mark only the images from that contact sheet that you'd like to print in final size. You might select 8 images from the 35 that printed on the contact sheet for example and then use "New Session w/Selected" to clear all the unwanted images out of the queue and remove any floating text that might have printed on the contact sheet so that the remaining 8 images are ready to be resized and printed.
Optimizing Space - If placement is set to "Optimal" or "Optimal/spaced", Qimage will always make the best use of space on the paper. In "Optimal" or "Optimal/spaced" mode, for example, Qimage will always be able to fit three 4x6 prints on a page that is at least 8x10 in size, whether the page is set up in portrait or landscape mode. This is because the "Optimal" placement setting is designed to make the best use of paper with no concern for the orientation or location of prints on the page. If "Optimal" placement is selected, there will be no space between prints. If "Optimal/spaced" is selected, Qimage will space prints as far as possible from each other given the amount of "slack" available on the page, allowing more room for error when cutting photos from the final page.
Note that when using either "Optimal" placement method, Qimage will not fill gaps by rearranging the order of prints in the queue unless you tell it to. For example, it will not fill a 3x2 "hole" on page one by moving a 3x2 print from page 4 unless the Sort Prints option (available via right clicking on the preview page) is used. The Sort Prints function will not only fill gaps in the printout by moving images in the queue, but it will also collate prints from largest to smallest size, making cutting prints from the page much easier. Note that to obtain truly optimal use of paper, the "Image Lock" button (lock icon below the preview page on the main window) must be in the up/unlocked position in addition to selecting "Optimal" or "Optimal/spaced" image placement. If "Image Lock" is on, you have told Qimage that it does not have permission to alter the orientation of prints (portrait/landscape) on the page in order to obtain the best use of paper.
In all other placement modes (other than "Optimal" or "Optimal/spaced"), Qimage paginates images into rows so that they can easily be cut with paper cutters (never requiring partial "swipes" of the blade), you may find that the order and/or sizes in which you inserted images in the queue doesn't always make the most of the space available on the page because Qimage is (1) trying to retain the order in which the images were added to the queue and (2) trying to avoid "random" placement of images onto the page to "fill holes". In other placement modes such as "Center" or "Compact", Qimage may not place three 4x6 prints on a page unless you specify a portrait size (4x6 and not 6x4) and you use a portrait page. In all automatic placement modes other than "Optimal" placement, images are arranged in "unbroken" rows such that each row can be cut straight across the page without intersecting other prints.
Page Background Color - Click the "Page Background Color" tool button under the preview page on the main window to set the background color for all pages in the queue/document. Note that the page background color is set globally and cannot be set on a page by page basis. Also note that using a page background color will use more (of sometimes only one color) ink since all non printed areas on the page will appear in the color selected. Also note that Qimage can only reproduce the background color on the part of the page that is accessable to your printer (the printable area). This means that you will likely still have some white border at the edges of the paper even if you choose a background color. To eliminate this problem, use the borderless printing mode in your print driver setup so that the entire page can be accessed by the printer when printing.
Full Page Editor - use the page editor to preview your document prior to printing and to make any manual adjustments necessary. The page editor will always go to the same page displayed at the top of the main screen in the small preview box. The page editor also allows drag and size of all images, text annotations, etc. Access the page editor by clicking the "Edit Page" button under the preview page or simply double clicking in white space on the preview page (or just outside the preview page).
Customizing Printouts

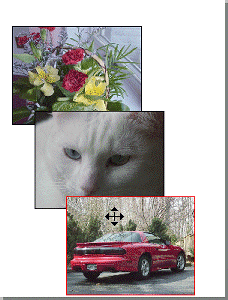
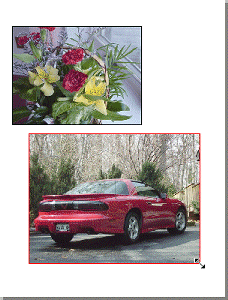
Original (centered)
Drag to
customize
Drag to size
Although Qimage has many options for automatic control of your printouts, there may be times when you simply want to place pictures manually on the page (see the "Freehand" option for details). This can easily be accomplished using the page editor. From the page editor screen you can visually drag all images to any location on the page. All images can be moved manually by pointing in the center section of the selected image and dragging to the desired location. Images may even overlap as they do above. Dragging to change the size of the image can be performed in a similar fashion by pointing to one of the corners of the image and dragging to the desired size (right page above). The page editor window is also the window to use when adjusting the crop for your prints.
Additional (non-visual)
commands 
In addition to the visual placement/sizing of images, there are a number of options available by right clicking on an image. Options such as cut, paste, etc. allow you to remove images, change the location of an image in the queue, etc. Location in the queue is also important for overlapping images. For example, the middle page above shows the car in front of the cat. This is because the car image appears later in the queue than the cat (later images are placed on top of prior images). To bring the cat to the front, simply click the right mouse button on the cat and select "Bring to Front". The cat will reappear in it's old location but will now be on top of both of the other images due to it's position in the queue.
Note that you may double click on any image on the page to edit the image itself (contrast, brightness, sharpening, levels, curves, etc.)
Page Orientation - defines whether the document is being viewed/printed in landscape or portrait format. You can quickly change from a portrait oriented document to a landscape oriented document (or vice versa) by clicking one of the page orientation buttons under the preview page on the main window.
Page Preview - The small preview page in the upper right corner can be used for adding/deleting images on the page and to change the size and fit of prints. You may select one or more prints on the page by clicking on them, and then change the parameters on the "Print Properties" auto-popup panel, or right click on the page for other options. Remember that for more complex/visual resizing and manual placement, you should use the page editor (click the "Edit Page" button under the preview page or directly on the right click menu from the preview page). There are many other detailed editing capabilities available in the page editor, including manual placement, text annotations, etc.
Changing Paper Size - Qimage uses the paper size as defined by your print driver. Simply click "File", "Printer Setup" and then click "Properties" to change the paper size associated with your printer. Once you change the paper size in your print driver and return to Qimage, the new paper size will be recognized automatically.
Using a Photo Editor with Qimage - Although Qimage offers a host of "quick fixes" for your images, there may be times that you need to use a full featured editor to correct images, such as when cloning of large areas is needed, etc. Qimage can work in conjunction with your photo editor. Click "Utilities", "File Manager/Photo Editor Setup" and then click the "..." selection button next to "Photo Editor". You can then browse and select the photo editor to use with Qimage by selecting the executable file (normally an EXE extension) from your photo editor's folder. Once you have done this initial setup, you should not have to repeat it again. You can then click on any thumbnail(s) and then right click and select "Edit Image(s) w/editor". This will bring the selected image(s) into your photo editor for manipulation.
Qimage Plugins - Qimage plugins can be obtained from the Qimage Plugin Center at http://www.ddisoftware.com/qimage/plugins. When you purchase a plugin, you will be supplied with a small file via email which you copy to your c:\program files\qimage\plugins folder. Once you drop the ".plg" file into that folder, the plugin will be accessible via the image editor. You can then add images to the queue and filter one/all via the image editor by dropping down the plugin filter box and selecting your plugin.
Preview - To preview a selection of thumbnails prior to adding them to the queue, simply select multiple thumbnails from the thumbnail window (or filenames from the file listing if you have thumbnails turned off) and then right click in the thumbnail area and select "Preview/Add to Queue". The thumbnails/files you have selected will be previewed one at a time. Simply click the "Add" button to add prints as you preview. You can cancel the preview at any time by simply clicking the small "x" in the upper right corner of the preview window to close the window.
Print Filter - Qimage filters can be set as "print filters" without associating the filter with images. If you set a filter as a print filter, all images loaded by Qimage will be filtered automatically by the print filter after all other filters (individual image filters and the global filter, if any) have been processed. Activating a print filter allows you to make adjustments to your printed output without affecting other operations such as display of images on screen, conversion of images, etc. Since print filters are applied as the last step just before the image is sent to the print processor, think of print filters as a way to place one final filter on the images just before they are printed. You could, for example, create a set of curves and activate those curves as a print filter to balance B/W prints on your printer. When this print filter is active, all your images are processed normally including application of individual image filters, and then the print filter is applied. For example, suppose you have an image that already has an individual filter that increases brightness and adds sharpening for that image. If you also have a print filter active that contains curves to balance B/W prints, your image will be loaded, the brightness and sharpening filters will be applied to the image and then the print filter will be applied as a second set of filters (on top of the brightness and sharpening filters on the image itself).
One useful application of print filters is consolidation of color and tonal balance between monitor and printer. As an example, if you find that your prints are not as saturated and have a green color cast compared to what appears on your monitor, you could create a filter that increases saturation and reduces the green channel (using curves). When you activate that filter as a print filter, what you see on your monitor will not change but all images going to the printer will have increased saturation and less green since they will pass through your print filter.
To set a print filter - Double click on any thumbnail or print to open that image in the image editor. Set up your filter any way you like and click "File" and "Save Current Parameters to File" on the top menu bar. Use a file name that describes your filter such as "saturation up-less green". Close the image editor window, return to the Qimage main window and check the "P.Filter" box on the bottom right of the window. Pick "Select Print Filter" from the popup and open the filter file that you saved from the image editor: your print filter is now active. Any and all images printed will pass through this filter on their way to the print driver.
To deactivate the print filter, simply uncheck "P.Filter" on the main window.
If P.Filter is checked, simply hold the mouse pointer over the P.Filter box for two seconds and the name of the currently active print filter will be displayed.
If P.Filter is unchecked, check the P.Filter box and the print filter last used will be listed at the top of the pop up window.
Print Image/File Information - check this box (called "Info" on the bottom of the main window on the "Job Properties" tab) to include file name, creation date, resolution, etc. in small text below each printed image on the page.
Print Info/Annotation Font - to select the font used to print image information and annotations, click "Edit", "Preferences", "Print and Page Formatting", "Print Info/Annotation Font" from the main menu.
Print interpolation and spooling options - Access these functions by clicking "Edit", "Preferences", "Printing Options" from the top menu on the main window.
Interpolation - If an image is printed too large for the given image resolution (such as a 640x480 image printed at 8x10 inches), it can become blocky. To increase resolution, you can use one of the seven included interpolation types below. To access Qimage interpolation options, select "Edit", "Preferences" on the top menu bar of the main screen, and then select "Printing Options".
Increasing resolution of printouts - To increase resolution of prints while not affecting original images, simply set the interpolation type and the interpolation level (none through max). Qimage will automatically increase printed resolution for you so that you never have to worry about DPI or resampling originals. Note that an interpolation setting of "Hybrid" and "Max" is fast and produces detailed prints. An interpolation setting (bottom of window, on the Job Properties tab) of "None" can be useful for printing screen shots and graphs where you may not want interpolation at all. The "Triangle" printing method offers reduced interpolation quality but incredibly fast printing speeds.
Increasing resolution of an existing image - Most of the time, you will probably only want to increase resolution of prints, however, you may also want to decrease resolution of images for web pages or increase resolution of images to increase image quality. To increase or decrease resolution of an existing image, double click on a thumbnail or print to open that image in the image editor. You may then change the resolution of the images in the queue by changing the values in the "Resolution" box on the bottom of the filter panel. The images may be resaved or the "filter" may be associated with the original file so that the image is resized prior to each operation in Qimage, however, note that the latter doesn't really make much sense since you almost never want to reduce resolution of an image unless you are preparing it for another medium such as the web, in which case you would want to create new images and not associate a filter with them. Note that if you apply the resolution to all images in the queue and all images are NOT the same resolution, all images will be changed by the same percentage based on original versus new resolution.
Interpolation Types:
Print spooling - Qimage offers the ability to control how data is sent to your operating system/print driver. You should always run Qimage in the "All Pages at Once" mode unless you are having trouble with crashes, lockups, or missing prints. Qimage sends more data to your printer than most other software programs due to its high quality printing algorithms. If your system runs out of spool space or has other problems with large jobs, try the "Spool one page at a time" or "Spool with time delay" option so that Qimage will pause after each page. The three print spooling options are listed below.
Network printing note: If you are printing to a network printer, "Spool all pages at once" will result in a single print job that contains all pages of your document. If your network print queue has a size limit (per job), it may be useful to send each printed page as a separate print job. This can be done by using "Spool with time delay" and setting the time delay to zero. Under those settings, there will be no time delay between pages, however, each page will be sent to the network queue as a separate print job, which may alleviate queue size limitations if a per-job size limit is in place.
Final Print Sharpening - Qimage offers the ability to apply different levels of unsharp mask to the final print. This unsharp mask is applied after all interpolation has been performed (after your print has been resampled to the DPI of your printer). Since this setting affects the sharpness of your prints, a setting should be used that makes your final prints match what is displayed on your monitor with respect to sharpness. The type of printer used and the print driver version can affect apparent sharpness of prints. It is best to leave this setting at the default slider position unless you prefer softer or sharper printed images. To make images look sharper, slide the slider to the right. To make images appear softer in print, slide the slider to the left. The following are notes that apply to the two different types of final sharpening available in Qimage:
Note: The sharpening level (slider) applies to both types of sharpening above and simply controls the level for the selected type of sharpening.
Windows NT/2000 users note: the "Spool one page at a time" option will not work under Windows NT/2000 unless you instruct the operating system to not "hide" messages from the print spooler. For more information, see the help tip in the troubleshooting section.
Print/Job Logging - Qimage can log all print jobs so that the job can be recalled at a later date. By default, Qimage will keep a log of the last 100 jobs, but you may also choose to log all jobs indefinitely or turn logging off altogether by selecting "Edit", "Preferences", "Job Logging" from the main menu. The job logs are maintained in the "Log" folder where Qimage is installed (normally \program files\qimage\Log). To access the job log, select "File", "Open Automated Job Log" from the main menu or click on the blue bullet next to "Job Log" on the "Job Options" tab in the lower right of the main window. Once you have opened the Job Log, you can browse, select, or open any saved jobs in the log.
Sample details for a selected job:
The following shows a print job containing six 4x6 prints on two pages:
* Qimage v2005.111
* Printing to: Canon i950
* Page: 8.00 x 10.68 in. (600 x 600)
* Printer ICC profile: Canon i950 MPH
* Interpolation: Max/High/Vector
* Print sharpening: On
* Global filter: Off
* Job started: 07/14/2003 03:02:24pm
* Job finished: 07/14/2003 03:04:47pm
1,c:\camera\10d\2003-05-16 23.36.51.JPG,4.00,6.00
1,c:\camera\10d\2003-05-16 23.36.05.JPG,4.00,6.00
1,c:\camera\10d\2003-05-16 23.34.43.JPG,6.00,4.00
2,c:\camera\10d\2003-05-16 23.34.09.JPG,4.00,6.00
2,c:\camera\10d\2003-05-16 23.33.34.JPG,4.00,6.00
2,c:\camera\10d\2003-05-16 23.31.38.JPG,6.00,4.00
Notice that there are nine header lines (preceded with *) that describe this print job, followed by a log of the six prints that were printed in the job. The format for the lines that describe individual prints (the last six lines above) is as follows:
page number,file path and name,width,height
Again, note that the comma delimited format gives you the flexibility to load the printer.txt file into spreadsheet software. Once loaded into cells, you can perform calculations based on printed size, number of pages used, etc.
Print/Job Logging and Tracking Paper/Ink Usage - Qimage Ultimate can display the total surface area used by printed photographs in one or more jobs. This can give you an idea of how much paper and ink was used by the selected print jobs. You might use this feature, for example, to keep track of approximate ink usage for the purpose of recovering media costs from multiple users printing from Qimage Ultimate. To access this feature, start by selecting "File", "Open Automated Job Log" from the main menu. When the list of jobs appears, you may select one or more jobs using the mouse cursor or shift-click to highlight a range of jobs. Note you can only select a single range, so ctrl-clicking cannot be used to turn off individual files within a range or to create two separate ranges. Once the range of jobs has been selected, right click and select "Paper/Ink Analysis". Qimage Ultimate will total all the prints in the selected jobs to tell you how much surface area was actually printed. For example, if you select a single job that contains five 8x10 prints, the result will be 8x10 = 80 times 5 prints for a total of 80 x 5 = 400 square inches printed. Note that only the photographs in the job are counted and any floating text does not count toward the total.
Keep in mind that while you can only select a single range from the list (you cannot turn off individual files within that range), you can combine the range with the search feature! Example: you want to know how much ink was used in 2011 to print photos for John Doe. You start by clicking the date column to sort by date and you select all 2011 files by clicking the first 2011 job and then shift-clicking the last 2011 job to highlight the entire 2011 range. Now since you know that all photos for John Doe have "jdoe" in the folder name, you click the search button in the top right of the dialog (binoculars button) and you type "jdoe" (without quotes) and click "OK". Now all jobs that contain "jdoe" are marked in green. When you right click now and select "Paper/Ink Analysis", only the files in the selected range that were marked by the last search will be counted (the green/highlighted file names). One final note: the search feature is used to mark files so ALL prints in each marked job are counted toward the total, meaning that the "jdoe" example would only work properly if you don't typically mix multiple customers in one job.
Summary:
- Mark a single job: right click to "Paper/Ink Analysis" to show paper/ink coverage for that one job.
- Mark a range of jobs by clicking/dragging or using shift-click to mark a range: a single job: right click to "Paper/Ink Analysis" to show paper/ink coverage for all prints in the selected range of print jobs.
- Mark a range of jobs and then use the search (binoculars) button to mark jobs with matching text: right click to "Paper/Ink Analysis" to show paper/ink coverage for all prints in the selected range of print jobs that were highlighted (green) by the search.
Print Proofs - Sometimes professional photographers need to print proofs for clients to review. These proofs should allow the client to review and select photos without compromising the photographer's work. The "Print Proofs" function on the "File" menu allows photos to be printed with watermarks which make the photos difficult or impossible to reproduce.
Print Rotation - If the
![]() image lock button below the preview page
is in the up position, Qimage will automatically rotate prints to
find the best fit on the page. Depending on the page layout and
other conditions, Qimage will place the print on the page either
not rotated (in the same orientation as the original image in the
thumbnail grid) or rotated left (CCW) 90 degrees. Once the print
is placed on the preview page, if you would like to override the
orientation selected by Qimage, you may rotate the print on the
preview page to any multiple of 90 degrees. To accomplish this,
use the following functions:
image lock button below the preview page
is in the up position, Qimage will automatically rotate prints to
find the best fit on the page. Depending on the page layout and
other conditions, Qimage will place the print on the page either
not rotated (in the same orientation as the original image in the
thumbnail grid) or rotated left (CCW) 90 degrees. Once the print
is placed on the preview page, if you would like to override the
orientation selected by Qimage, you may rotate the print on the
preview page to any multiple of 90 degrees. To accomplish this,
use the following functions:
- Don't Care (Auto): Allow Qimage to make the decision about rotation automatically.
- 0 (Same As Thumbnail): Print will appear in the same orientation as the original image and the thumbnail in the thumbnail selection grid.
- -90 (Thumbnail Rotated Left): Print will appear in the orientation of the thumbnail rotated left 90 degrees.
- 90 (Thumbnail Rotated Right): Print will appear in the orientation of the thumbnail rotated right 90 degrees.
- 180 (Thumbnail Flipped): Print will appear in the orientation of the thumbnail flipped upside down.
Note that once you rotate a print, a small red rotation icon will appear on the print on the preview page and in the page editor indicating that the print has a specific orientation/rotation associated with it. Once the red rotation icon appears on the print, the orientation of that print is "fixed" and Qimage will not auto rotate that print to try to fit more prints on a page. By rotating the print and getting the red rotation icon on the print, you have indicated that you want to take manual control of the orientation of that print. To remove the rotation "flag" and return to automatic rotation so that Qimage has permission to rotate the print as needed, simply point to the red rotation icon on the print until you get a mouse pointer with a ? (question mark). You can then click and return rotation control to Qimage. Another way to return control of rotation to qimage is to select/highlight the print on the preview page and then right click on that print, select "Set Print Rotation" and choose "Don't Care (Auto)".
Printing to file versus printing to a printer - In addition to being able to print your document to your local or network printer (the default mode of operation), Qimage is also capable of printing each page to individual files. To switch all Qimage printing operations so that your document is printed to files (one file per page), simply click "File" on the main window menu and then select "Print To" and choose "File". Once "Print To" is set to "File", all print operations can still be performed as if you are printing to a printer, however, each page is stored as a file in the name/location you specify at print time. To switch back to printing to your printer(s), click "File", "Print To" and select "Printer". The descriptions below will assist in determining when to use these print modes:
Printer: When "Print To" is set to "Printer":
File: When "Print To" is set to "File":
Printer Setup - click "File", "Printer/Page Setup" to set printer driver properties (quality, paper type and size, resolution, etc) before printing to obtain the highest quality results for finals, or lower quality for drafts/proofs, etc.
Saving and Restoring Printer Setup Properties - Since different printer driver properties are required for different types of paper, it is helpful to have a way to save printer driver properties and later retrieve them. Click "File", "Save" and then select "Printer Setup" at the bottom of the save dialog. Specify a name and click "Save". All print driver settings such as paper size, paper type, print quality, etc. will be saved along with all Qimage related print settings such as the printer profile, margins, etc.. Click "File", "Recall" and select "Printer Setup" at the bottom of the recall dialog at a later time to restore printer driver properties.
RAW Format Options - The following options apply to raw format images from digital cameras.
Sharpness and Adaptive (ISO) Noise Reduction:
Exposure:
Working Color Space:
Quality for On Screen Views and Small Prints:
Quality of Thumbnails:
Confirming/canceling your changes
Red Eye Correction - Red eye/redeye is a condition caused by direct flash photography. When light from a camera's flash bounces off the retina of the human eye, the pupil of the eye appears bright red in the photograph. Red eye can be avoided by using a different flash technique such as bounce flash or changing the location of the flash unit to the side or top/bottom, however, Qimage offers a tool to correct red eye in photos where red eye was unavoidable. Red eye is considered a "blemish" in Qimage and therefore must be removed via the blemish corrector. Removing red eye is no different than removing a blemish, except that the blemish (red pupil) must be removed by darkening the "blemish" instead of blending with surrounding colors. The only thing to remember here is that you must click in the center of the eye (pupil) and drag the mouse pointer to the left when removing redeye.
For more information on how to remove blemishes and info on how to access the blemish correction, see the Blemish/Pixel Corrector section.
Reordering Prints on a Page - You can change the position of a print in the document by moving it up or down in the queue. Simply click on a single print on the preview page and then right click on the preview page and select "Up" or "Down" to move the print backward or forward in the document respectively. Note that after you have selected one print on the preview page, you can also use the up and down arrow keys to move the print as well. When performing this action, the selected print will either advance or recede in the queue and the printed page unless you are operating in "Freehand" image placement mode. In Freehand placement mode, changing the order in the queue only changes which images get printed first on the page but will not change their locations in the document (since all positions are manually specified). Even in Freehand placement mode, however, this function has a benefit: it will allow you to change which print appears on top if you have overlapped two prints intentionally.
Scrapbooks - The power of Qimage allows you to quickly and easily create scrapbooks. You can use the page editor to perform manual sizing and placement and use the image editor to create cutouts for your images.
Search IPTC Image Info - Qimage allows you to search the current folder and all subfolders for certain IPTC data. For example, you may have entered a keyword "bird" on all your bird shots and would like to find a certain bird. Let's assume your main photo folder is c:\images. Simply navigate to the c:\images folder using the folder browser above the thumbnails. This sets the starting point for the search. Then right click in the thumbnail grid and select "Search IPTC Image Info". You may then check the "include subfolders" box, enter "bird" next to the "search words" parameter and click the "add" button to add "bird" to the list of search words, and then check the "keywords" field to search for the word "bird" in the keywords IPTC field. Next click "Go" and Qimage will find and display all images with the "bird" keyword. Remember that IPTC data only applies to JPEG and TIFF format images so other images like raw images, GIF images, BMP images, PSD images, etc. will not be included in the search.
Selected Thumbs/Files - When you select (mark) one or more thumbnails, you can right click anywhere in the thumbnail display area to drop down a menu of options. Note that the right click menu is separated into a group of functions that apply to the selected thumbnails (top group) and a group of functions that only apply to the thumbnail currently under the mouse pointer (bottom group).
Selective Color Filter - The selective color filter is a powerful tool that allows you to specify separate changes that are applied to each primary color (red, green, blue, yellow, magenta, cyan) plus neutral. For example, the selective color filter can be used to increase/decrease the intensity of only the red colors in the image, reduce a purple tint in blues, increase saturation of greens, etc. Access the selective color filter by opening the image editor window and clicking the "Sel. Color" tab at the top/right of the window.
The values used by the selective color filter are:
The selective color filter allows you to enter changes in RGB value for each primary color plus neutrals (grays). The rows in the table represent the hue of the input color (pixels) while the columns represent multipliers to use against the RGB values of the input image. A value of 1.0 means "no change", so the above filter is a "do nothing" filter since regardless of the color of the input pixel (R,G,B,Y,M,C,N), the RGB values of the input pixels will be multiplied by 1.0 to arrive at the result. In other words, if the hue of the pixel in the image is red, we look at the top row of the table labeled "R" and read across. The red, green, and blue change for red pixels is 1.0, 1.0, 1.0 so the filtered pixel color will be 1.0*R, 1.0*G, 1.0*B. If the "R" values were 0.5, 0.5, 0.5, the filter would effectively reduce the intensity of all red colors to half the original intensity.
Note that the filter extrapolates the weightings in the above table between primaries, so a color that is halfway between red and yellow will be filtered with an average of the "R" and "Y" weightings in the table. The colors in the selective color table are arranged in hue order to help you visualize the change to colors "between" two rows in the table. Also note that as primary colors become desaturated, they shift toward neutral gray ("N" in the table above). The following example illustrates how the values in the table are utilized:
Example: reduce intensity of red colors
To reduce the intensity of red colors, we might enter 0.5, 0.5, 0.5 on the "R" row in the above table. This tells the selective color filter to reduce the RGB values to 50% when the color is red. Let's assume that this is the only change to the above table, so that all values in the "R" row are 0.5 while all other values in the table remain 1.0.
| Pixel | Color Name | Input RGB | Red Chg. | Green Chg. | Blue Chg. | Filtered RGB |
| 1 | Pure Red | 255,0,0 | 0.5 | 0.5 | 0.5 | 128,0,0 |
| 2 | Pure Dark Red | 50,0,0 | 0.5 | 0.5 | 0.5 | 25,0,0 |
| 3 | Yellowish Red | 255,128,0 | 0.75 | 0.75 | 0.75 | 191,96,0 |
| 4 | Pure Red - Desaturated | 255,128,128 | 0.75 | 0.75 | 0.75 | 191,96,96 |
The above table shows what happens to four different pixels passing through our "reduce red intensity" filter.
Here are a few real world examples that illustrate how to use the selective color filter:
Note: you can increase/decrease the intensity of all of the above examples by leaving all 1.0 values untouched and simply multiplying all non 1.0 values by some scalar multiple. If an image has a severe green color cast for example, you could enter 1.0, 0.8,1.0 instead of 1.0, 0.9, 1.0.
Advanced use of the selective color filter: matrix transformations
A 3x3 matrix may be used for each row (R,G,B,Y,M,C,N) in the table to specify a color matrix transformation for that row. Matrix transformations can be rather complex and should be left to the advanced user who is at least somewhat familiar with matrix multiplication. If you wish to learn how to specify matrix transformations using the selective color filter, please read on.
Color matrix transformations are advanced filtering tools that allow you to modify the color characteristics of an image by supplying nine parameters of a 3x3 array. RGB values for each pixel in the image are then multiplied by the 3x3 matrix to form the final image.
In contrast to entering a single value as a simple weighting in the selective color table, matrices are specified via entering three values in each of the three boxes, separated by commas. For example, to specify the "identity" matrix in the "R" row of the table, enter 1.0,0.0,0.0 in the first box, 0.0,1.0,0.0 in the second, and 0.0,0.0,0.1 in the third box. Since a different matrix may be entered for each of the 6 primaries plus the neutral "N" row, you can actually have a filter that specifies seven different matrices, each to be applied to a specific color band. Note that you can make the selective color filter perform like a single 3x3 matrix by simply entering the same three values in all seven boxes in each column.
The following will serve as background on how Qimage handles matrix transformations. Matrix arrays are used to process RGB values by taking each pixel's RGB values and multiplying those RGB values by a 3x3 matrix. Consider a pixel with red, green, and blue components RGB and an arbitrary matrix:
When you multiply an RGB value by the above matrix, the result will be R'G'B' dictated by the following:
R'=(R)(a11)+G(a21)+B(a31)
G'=(R)(a12)+G(a22)+B(a32)
B'=(R)(a13)+G(a23)+B(a33)
The simplest form of matrix transformation is the "identity" matrix which does nothing to the RGB values (RGB in = RGB out):

Following from above, the identity matrix gives us:
R'=R*1+G*0+B*0
G'=R*0+G*1+B*0
B'=R*0+G*0+B*1
When we simplify:
R'=R
G'=G
B'=B
To enter the identity matrix as a selective color filter in Qimage, simply enter 1.0,0.0,0.0 in all seven entries in the "Red Chg." column, 0.0,1.0,0.0 in all seven entries in the "Green Chg." column, and 0.0,0.0,1.0 in all seven entries in the "Blue Chg." column.
Using different scalar multiples of the identity matrix allows us to perform changes to each color channel. For example, if we want a filter that reduces the green channel because our image has an overall green cast, we might use this matrix to reduce the green channel by 20%:
To use this matrix as your selective color filter, enter 1.0,0.0,0.0 in all seven entries in the "Red Chg." column, 0.0,0.8,0.0 in all seven entries in the "Green Chg." column, and 0.0,0.0,1.0 in all seven entries in the "Blue Chg." column.
Note that these simple matrices are not really useful since the above example can be (much more simply) specified without using a matrix by entering 1.0 in all seven entries in the "Red Chg." column, 0.8 in all seven entries in the "Green Chg." column, and 1.0 in all seven entries in the "Blue Chg." column. So why allow matrix calculations at all? Because they allow you to perform more complex functions that go beyond simple changes to individual color channels. As a simple example, you could enter 0.0 in the first two "R" columns and 1.0,0.0,0.0 in the third column. This will turn all red colors into shades of pure blue. To illustrate a "real world" example, click "Load" on the selective color filter tab and load the "black and white" selective color filter. Implementation of more complex examples is left to the user.
Slide Show - a slide show is available for the purpose of viewing images in a detailed format on screen. This option allows detailed examination of each image in the queue and allows final review prior to printing. To access the slide show, add images to the queue and then right click on the preview page and select "Slide Show". Thumbnails may also be viewed full screen by right clicking on the thumbnail (see Full Screen View for more details).
Slide Show Options - When you first access the slide show, you will notice that a slide show options menu appears first (if you turned this option off, you can access it via "Edit", "Preferences", "Slide Show Options"). The slide show options menu includes the following settings:
Soft Proofing - Qimage allows you to proof the colors in your prints by emulating (on screen) what the prints will look like if printed with the current color management settings. Soft proofing uses the color response defined in three different ICC profiles to simulate the color of your prints on your monitor. It is therefore possible to preview printed color on your monitor prior to creating the actual hard copies. Accurate soft proofing requires that you have a printer profile active in "Prtr ICC" on the lower right of the Qimage main window on the "Job Properties" tab as well as an accurate monitor profile and a known image color space. Soft proofing depends on accurate ICC profiles and proper color management setup. In order to assist you with proper setup for soft proofing, the following describes settings in more detail.
Printer ICC profile (Prtr ICC): A printer profile must be active in order to soft proof because the printer profile describes the color response of the printer. Without a printer profile active under Prtr ICC, soft proofing is disabled.
Monitor ICC profile (Mntr ICC): A monitor profile (preferably a custom profile derived using a colorimeter that attaches to the screen) is recommended. An accurate monitor profile ensures that printed colors can be emulated accurately on screen. If no monitor profile is active, Qimage will still allow soft proofing, however, sRGB color space is assumed for the monitor.
Image ICC profile (image color space): Assuming you have a printer profile active in Qimage's Prtr ICC, the image color space will be listed in the queue when you add an image to the queue. Simply add an image to the queue and look at the right side of the line in the queue for the image color space. The color space listed is the color space associated with the image itself. If no color space is embedded in the image file, Qimage will assume sRGB or will pick an appropriate profile from the "input" profile list under "Edit", "Preferences", "Color Management".
Notice that when we soft proof colors, we are interested in the color response of three different devices: the printer, the monitor, and the device that captured the original image. Having accurate profiles that describe how all three of these devices reproduce color via using an ICC profile for each device as above will ensure accurate soft proofing.
Soft Proofing in Qimage
Soft proofing may be used in two places within Qimage: on a per-image basis or a per-page basis. After ensuring that all color profiles are appropriate as above, you can simply move the mouse pointer over a thumbnail in the thumbnail display and press Ctrl-Space to soft proof the image under the mouse pointer (right clicking on the thumb and selecting "Soft proof" may also be used). In addition, you may soft proof entire printed pages by first adding images to the queue and then going to the page editor (click the "Edit Page" button under the preview page) and clicking the "Soft Proof" button on the right side of the window. We recommend leaving the "View" dropdown on the bottom right set to "Thumbs/Small Images" so that page views are faster and updates can be performed without the added delay of creating detailed soft proofs. Using the "Soft Proof" button allows you to work in a faster mode such as "Thumbs/Small Images", only using the more time consuming "Soft Proof" display when needed. Note that if your "View" is set to a fast display such as "Thumbs/Small Images" and you click the "Soft Proof" button, the soft proof view is only active until you make a change to something on the page. Once a change such as resizing, moving, etc. is made, the view jumps back to what was previously used. The "Soft Proof" button should therefore be used to temporarily convert the currently viewed page to a soft proof. If you don't mind the extra time required to generate page views in "Soft Proof" mode, you can manually select "Soft Proof" by dropping down the "View" box and selecting "Soft Proof" as your permanent view. Note that pages will generate much more slowly in this mode, however, so you may wish to consider doing most of your work in a fast view such as "Thumbs/Small Images" only activating a temporary soft proof view when needed to assess printed color.
The proofing setup such as the profiles being used, rendering intent, etc. can be found on the "Edit", "Preferences", "Color Management" window. Qimage uses the settings on this window (including rendering intent) when generating soft proofs. Since Qimage uses the same window and settings for both soft proofs and print setup, you can always be sure that your soft proofs match your print settings.
When soft proofing individual images via the thumbnail grid, you can right click on the soft proofed image and select "Original" to see the original image (profiled for your monitor) or switch back to the "Soft Proof" to see the emulated print colors. Switching between "Original" and "Soft Proof" can give you an idea of the differences you can expect between the monitor and the printed image. Note that the space bar may be used to toggle quickly between "Original" and "Soft Proof" for easy comparison.
Proofing Accuracy
Remember that soft proofing is designed to give you an idea of printed color by displaying a simulation of your prints on screen. Soft proofing should not be used to judge image sharpness, quality of interpolation, or any facets of image quality other than color. Also note that the accuracy of soft proofing depends entirely on the accuracy of your printer profile, monitor profile, and image profile. In the process of generating a soft proof, two separate profile conversions are being performed, using your image profile and monitor profile once and your printer profile twice! Due to the number of conversions required, it is important to ensure the accuracy of all of your ICC profiles and the proper use of color management in Qimage in order to get the most out of soft proofing.
Sort Prints - Qimage always maintains the order of prints in the queue, even when placement is set to "Optimal". This allows you to refine your printed document by scrolling through page by page and print by print, selecting new fitting and size options without worrying about prints being re-sorted or losing track of where you are in the queue/document. Once the document is ready to print, however, you may wish to let Qimage take control of the placement and order of images in the queue. Right clicking on the preview page and selecting "Sort Prints" will sort prints from largest to smallest, placing 5x7 prints first, 4x6 next, then 3.5 x 5, etc. Having similar sizes grouped together makes cutting photos simpler and also uses less space in many cases. When in "Optimal" placement mode, the "Sort Prints" feature has an additional benefit: it will not only sort by size, but also will look for ways to fill gaps on pages by moving smaller prints to fill "holes", resulting in the most efficient printing possible and the greatest paper savings.
Templates - Note that in addition to the thumbnails of images in the current folder, there is always a blank [Template] at the bottom of the thumbnail list. You can select [Template] as you would a normal image and drag it to the page or add it to the queue (all templates show as red rectangles). Let's say you would like to create a freehand setup that has templates exactly where you want them on the page. For example, some picture frames hold multiple prints of different sizes in different locations within an 8x10 frame. You could add the appropriate number of templates to the queue and manually arrange them on the page to fit in the multi-frame. Next, save the session by clicking "File", "Save" from the top menubar on the main screen and then selecting "Session" on the save dialog. The templates and locations will be saved in the file that you named.
When you load the above session by clicking "File", "Recall" and then specifying the file name, the prior template locations will be restored. If you want to replace the templates on the page with new images while retaining the size and location of the templates, simply drag an image and drop it onto the template on the small preview page (note that all blank templates show up as red rectangles).
Note that dropping a thumbnail on an existing image will not replace that image as it does when you drop on a template. Dropping a thumbnail on the left side of an existing image will insert the new image before the existing image. Similarly, dropping a thumbnail on the right half of an existing image will insert the new image after the existing image. So... is there any way to replace an existing image (not a template)? The answer is yes. Since templates and images differ in their purpose, if you have an actual image that you want to replace, you can do this as well by performing these steps:
Note: you do not have to perform the first step above. It is only to assist you in knowing which file in the queue is associated with which image. If you already know the filename, you can simply drag the new thumbnail directly to the filename in the queue and drop it.
Test Strips - Before printing large prints and committing large amounts of paper, printing a small section of the large print can be helpful for the purpose of judging detail, sharpness, and color. There is a "Test strip" function on the full page editor that will allow you to create a small, proportional print that contains a piece of the larger print. From the main window in Qimage, start by adding the photo you wish to print at the desired final size (20x30 inches for example). Then click the "Edit Page" button below the preview page, select the print on the page, click the "Cropping" button on the right and the "Test strip" button will be visible under the small crop window. The test strip button can be used in any of the following ways:
Thumb Builder - The "Thumb Builder" menu item on the main window is active only when thumbnails are being built in the background, as they would be when entering a folder with many images for the first time. If the text just above the folder history dropdown reads "Building thumbs..." followed by a counter, you can use the options on the "Thumb Builder" menu to:
Note: Qimage has two thumbnail builders: a foreground thumbnail builder (for thumbnails you can see on the thumbnail grid) and a background thumbnail builder (for thumbnails that are beyond the current view on the grid). The above functions apply to the background thumbnail builder. When you first enter a folder that you have never visited before with Qimage, thumbnails for the first page on the thumbnail grid (the thumbnails that are visible at the top of the grid) are built first, before the background thumbnail builder starts. The background thumbnail builder will start processing thumbnails after the foreground thumbnail builder is finished (first page of visible thumbnails is built). The above functions will therefore become active once Qimage has finished displaying the thumbnails that show on the grid and has started building ones you can't see yet (because you have not scrolled to them yet).
Thumbnail Font - Click "Edit", "Preferences", "Thumbnail Font" to change the font that appears under each thumbnail on the main screen.
Managing the Thumbnail Cache - Click "Utilities", "Manage Thumbs and Raw Cache" for options regarding storage of thumbnails and Lightning Raw cache by Qimage. To recover hard drive space used by Qimage, you can choose to delete thumbs/cache for images past a certain "age", simply delete all thumbnails, or open Windows explorer to browse the thumb/cache folders. Note that if thumbnails are deleted, they will reappear with each folder visited, and since Qimage will need to rebuild the thumbnails in those folders, thumbnail loading will be slower the first time the folder is accessed. If you would like to use a different drive to store Qimage application data like thumbs and raw cache, use "Utilities", "Migrate Qimage Application Data" to change the drive/folder that Qimage uses to store this data.
We recommend deleting all thumbnails more than 6 months old about once a year.
Thumbnail Quality - Click "Edit", "Preferences", "Thumbnail Quality", and select the thumbnail quality (default is Best). Setting thumbnail quality to "Low" will result in faster thumbnail building the first time you enter a new folder and less space used in the Qimage thumbnail cache, but may result in images appearing pixelated (grainy) on the preview page from the main window. In contrast, increasing the quality to "Best" will result in slightly slower thumbnail loading the first time thumbnails are built in a folder and increased space requirements for the Qimage thumbnail cache, but with increased quality (less grainy) page previews.
Units - Qimage can operate in full metric/English units, and will remember your last setting. Click "Edit", "Preferences", "Units" to change the default units of measure in Qimage.
Unsharp Mask - Unlike the name implies, this filter is actually a high quality method for sharpening images.
To access the unsharp mask, double click on a thumbnail or print to open that image in the image editor. Enter values for "Radius" and "Strength" and click "Done", "OK" to associate the filter with the original image.
About the Qimage unsharp mask:
The radius parameter equates to the width of the sharpened edges. The larger the radius, the wider the edges will appear. The strength parameter is the contrast of the edges so that the higher the strength, the more contrast the edges will have. Typical values for radius and strength start at about 1/100 or 2/100 respectively so these are good starting points. Note that Qimage does not use a "threshold" parameter since sharpening is performed on the luminance channel only, avoiding noise and color fringing that the "threshold" is meant to address.
USM tone targeting: Due to the way most (Bayer based) image sensors capture images, some colors in the image may appear sharper than other colors. For example, black, white, and gray details may appear sharper than red, blue, or green details because fewer pixels on the sensor are contributing information for those colors. Moving the slider to the right will sharpen saturated colors more than black, white, and gray areas, thereby compensating for the sharpening discrepancy of images captured by most digital cameras. With the slider at max, use a higher level of sharpening such as 2/200 to see the effect. Using a radius of 2 and strength of 100 to 200, you can increase the '3D effect' of your photos because sharpness will be equalized across all colors.
Tone Targeted Sharpening:
- Sharpen/soften certain toned or RGB values: Sharpening/softening a specific subject: By default, tone targeted sharpening is set to equalize sharpness of Bayer based camera images. You can override the default and select a specific color to target for USM so that the selected color gets the vast majority of sharpening without sharpening other colors. Click the dropper in the "USM Tone Targeting" group on the image editor window and then click on a representative color from your subject in the image. Your unsharp mask (USM) will now only affect colors (tones) close to the one selected. Keep the slider at "max" to maximize the effect or slide to the left to reduce the effect. With the slider at the left (off), all tones in the image will be sharpened equally. As you move the slider toward "max", sharpening focuses more on the selected color and less on colors that differ from the selected color. Click the small color panel to the left of the dropper for a list of special options such as the ability to target all colors except the selected color, ability to target saturated colors, or the ability to target neutral colors.
- To sharpen the targeted areas, use a positive strength in the USM strength parameter.
- To soften the targeted areas, use a negative strength in the USM strength parameter. Note that when softening, strengths beyond -100 (such as -150, -200, etc.) may cause artifacts.
- To sharpen and soften different areas at the same time, use the bottom option in the dropdown that appears when you click on the color panel in the "USM Tone Targeting" group. It allows you to sharpen the targeted area while softening others or vice versa.
- To reset tone targeted sharpening to the default "sharpness equalizer" setting, simply right click on the dropper button.
White Balance - This filter readjusts the white balance of your image(s).
To access the white balance filter, double click on a thumbnail or print to open that image in the image editor. Next, click the small eye dropper button and click on (what should have been) a neutral area (white or gray) of the image. Note that the area should be at least 6x6 pixels in size (don't click on single pixels of white, etc). One you have clicked on an area that should appear white in the photo, click click "Done" to save.
Notes on white balance:
Notes regarding color profile plugins, ICC profiles and RAW images: