Digital
Images: Foveon X3 versus Bayer
An image quality study based on SD9 samples
by Mike Chaney
Please note: All
images (c)2002 Digital Photography Review, http://www.dpreview.com.
Images used with permission of original photographer.
This page is not sanctioned by dpreview.com
As many people try to get a handle
on the image quality differences between Foveon's full color
image sensor and traditional Bayer sensors, I decided to do a
short study of a few samples. Since the SD9 captures all three
color channels at each photo site, it is possible to "Bayerize"
a few samples by discarding all but one color at each pixel to
create a standard Bayer mosaic pattern. That pattern could then
be "fed" to Qimage
Pro in the form of a raw Bayer image,
allowing Qimage Pro to recreate the image as if it were shot on a
Bayer camera. In doing so, we can effectively compare a 3.4 MP
image from a Foveon X3 sensor to what we would expect from a 3.4
MP Bayer sensor. The samples on this page should be used for
purposes of illustration (of concepts) only. Since Bayer sensors
capture images very differently from full color sensors like the
Foveon X3, it is important for viewers to understand the
differences between the two technologies in order to understand
how to evaluate images once reviews of full color sensors start
to appear on digicam review sites. Since Bayer and full color
sensors differ so significantly in their ability to capture
different types of detail in an image,
it is important to understand that comparing Bayer sensor images
with full color sensor images requires examination of more than
just details on a black and white resolution chart! Hopefully
this page will illustrate what to look for when comparing image
resolution and quality across different sensor designs. Until
now, the methods of comparing image quality from camera to camera
were less important because all cameras used the same type of
single color Bayer sensor. Now that full color sensors are making
their way onto the market, we need to understand what we've been
missing (using single color sensors) and what to expect with full
color sensors. The process of comparison that was used on this
page is simple:
Download an SD9 sample image from DPreview
"Bayerize" that image by
discarding color information in a Bayer pattern
Demosaic the Bayerized image using a good
Bayer interpolation algorithm.
Provide the "Bayerized" version
which has been reconstructed to full color and saved at a
similar JPEG compression, along with the original SD9
image for comparison
Review results to compare one sensor
technology to the other
Here is a visual depiction of the process of
"Bayerization" as described on this page, and an
illustration of how a full color sensor "sees" the
world versus a Bayer sensor:
| What an X3 sensor sees |
What a Bayer sensor sees |
Bayer after interpolation |
 |
 |
 |
Original SD9 crop
This is what the SD9
"sees" on the sensor and
also represents the SD9
final image* |
The original after
"Bayerization". This is
what a Bayer sensor
"sees", A.K.A. the raw
image. |
The image reconstructed
from the "Bayerized"
version. This is the final
Bayer image after being
processed (no AA filt.). |
* Not including white balance and final color adjustment.
A note about validity and practical application of the
samples here
Please note that the process that I am calling "Bayerization"
involves manipulating data from a full color device to produce a
theoretical Bayer sensor. We can do this (in theory) since a
Bayer sensor is analogous to a full color sensor with 2 of 3
color channels omitted at each photo site. Due to differences in
the optimization of each design however, actual/practical results
will vary from the examples on this page, but should generally
lie somewhere between the two Bayerized versions displayed. More
information regarding the difference between the Bayerized
samples and Bayerized samples with AA filter is given below.
In writing to Phil Askey about the information on this page,
he had reservations about the actual comparisons regarding my
Bayerized samples that did not include at least a simulated AA
filter. AA filters (short for antialiasing filters), A.K.A.
"low pass filters" are used in nearly all Bayer cameras.
The AA filter is basically a "blurring" filter that is
placed somewhere between the lens and the image sensor (usually
right on top of the sensor). This blurring filter is used to
eliminate aliasing of high frequency spacial detail due to the
lens being able to resolve detail higher than the Nyquist
frequency, which can result in color aliasing. This blurring
filter is needed basically to reduce color distortions in the
Bayer design due to its single color capture per pixel. As a
result, and due to popular request, I have updated this page to
include samples that simulate what a normal Bayer sensor would
see if it were equipped with an antialiasing filter such as those
found in most dSLR's. With this information in mind, here is a
description of the samples presented on this page:
- Original full color image: the original image was the
image that the SD9 camera captured in full color detail.
- Bayerized image: this is the original image with 2 of the
three color channels omitted at each pixel (in a Bayer
mosaic pattern) and reconstructed with a demosaicing or
"de-Bayering" algorithm similar to what is
found in dSLR cameras.
- Bayerized image w/AA filter: these images are the same as
the Bayerized image, except a blurring filter was applied
to the original image prior to the Bayer --> de-Bayer
process, simulating what would happen with an AA filter
installed. This blurring filter should effectively
simulate the effect of an AA filter in front of the CCD.
In this case, a blurring filter with a 1 pixel radius and
linear "falloff" was used. The final de-Bayered
image in this case is softer due to the blurring filter,
so an unsharp mask of 1 pixel radius and 150% strength
was also used on the final image. This sharpening should
be similar to most normal in-camera sharpening algorithms.
In the end, actual tests of the SD9 camera will be the only
true way to evaluate image quality. After comparing the images on
this page, you may now be armed with more knowledge about what to
look for and how to compare images. As you can see, there's a lot
more to quality than just resolving black and white horizontal/vertical
lines.
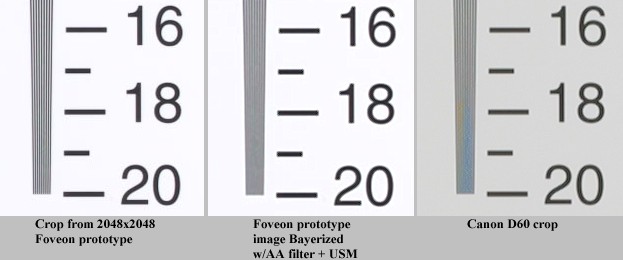
Update (10/03/02) - Tuning the Simulated AA Filter
Peter posted a good idea on the DPreview forums about tuning
the simulated AA filter that I used in these samples. The idea is
to use a crop from a Foveon based image of a resolution target
that can be compared directly to a good Bayer sensor with the
same resolution. If my Bayer-DeBayer code produces a result very
close to a real Bayer sensor, we would have more assurance that
my simulated AA filter is not too weak, not too strong. Here's
the thread on DPreview. In performing this test, I did find
that my AA blurring filter was slightly over aggressive and
needed to have less blurring effect to match what we would expect
from an actual Bayer based camera. As of 10/03/02, I have
replaced all Bayerized-with-AA samples on this page with the
retuned versions, including the crops at the bottom of the page.
Note that while I did end up retuning my simulated AA filter
slightly, it did not have a very noticeable effect on the Bayer-with-AA
samples. The retuned Bayer-with-AA samples do, however, appear
slightly sharper than the original samples that I posted here.
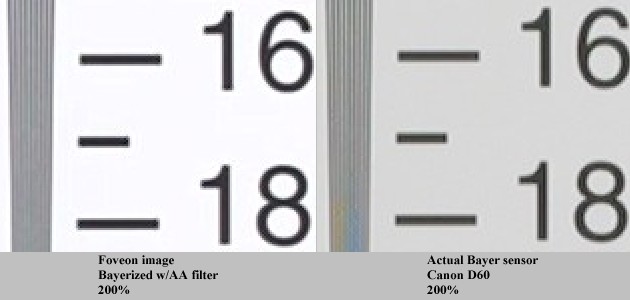
The crops below show the original Foveon image (left), my
Bayerized simulation with AA filter (middle), and what an actual
Bayer camera records (Canon D60) on the right. In addition, you
can see from the bottom 200% zooms that my Bayerized-with-AA crop
closely matches the detail available in the same crop from an
actual Bayer camera. While this is not a complete proof of
concept for my Bayerization techniques, it at least indicates
that my Bayer-with-AA samples do a reasonable job of simulating
an actual Bayer sensor with respect to detail and sharpness.
Samples
Sample 1: Portrait

Link
to Phil's SD9 original
Link to
Bayerized version
Link
to Bayerized version with simulated AA filter
Sample 2: Landscape

Link
to Phil's SD9 original
Link to
Bayerized version
Link
to Bayerized version with simulated AA filter
Conclusion
I'll leave any final conclusions regarding "resolution
equivalents" or other absolute comparisons to the reader, as
they really have little merit anyway until actual controlled
tests can be performed. As for the samples on this page, simply
download versions and zoom/examine side by side. Frankly, I was
surprised at how well the image reconstructed after being
Bayerized with no AA filter, however, since nearly all single
color [sensor] cameras have an AA filter over the CCD, the
samples that include the simulated AA filter will probably be
closer to what you can expect from actual Bayer based cameras.
Overall, the images held up reasonably well considering the
Bayerized image started with only 1/3 the amount of captured
information, however, there are some obvious areas where the
Foveon X3 (full color sensor) technology excels, particularly in
areas of high frequency detail. Some notable areas are shown
below. The first two examples show some loss of high frequency
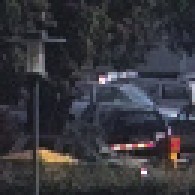
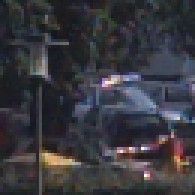
detail in the Bayerized version while the third example shows
loss of chrominance (color) detail in the parking lot gate as the
Bayer interpolation algorithm "removed" color
information because the sampling frequency was too low to obtain
true color. Due to the increased low level detail and lack of
artifacts, it is likely that the Foveon sensor design will
produce images that can withstand significantly more processing,
including the ability to resample images to larger sizes and
produce large prints.
In conclusion, some things to look for when comparing Bayer
and Foveon sensor images:
- Bayer sensors have a very significantly reduced
resolution when resolving detail comprised of mainly red/blue
primaries, such as a red sports car with black pin
stripes, a blue sweater with red lettering, red soda can
with black lettering, etc. In these cases, resolution of
the Bayer sensor is reduced to less than 1/4 of its
"image" resolution! Black and white details
will show the highest resolving power on a Bayer sensor,
while saturated color detail will vary greatly. A Foveon
sensor is much more consistent, resolving near the full
resolution of the images for every color combination.
- Bayer sensors will produce images that are softer and
less detailed due to the "smoothing" needed to
eliminate artifacts and color distortions.
- Bayer sensors tend to omit chrominance (color)
information when sampling high frequency detail. If you
look at a picture of a tree that has many small branches
with a brick wall behind it for example, you will see
that many of the smaller branches "morph" into
the color of the bricks in the background. This is
because the branches are not wide enough to cover the
multiple pixels needed to derive accurate color
information on a Bayer sensor. Full color sensors
completely eliminate this problem.
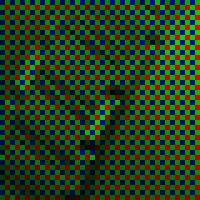
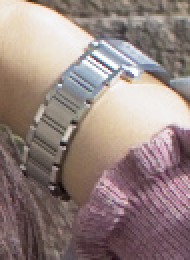
- Bayer sensors tend to produce color moire on high
frequency detail like the cuff of the jeans below (more
visible in center image).
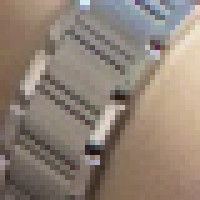
 |
 |
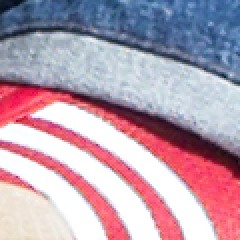 |
| Cuff (200%) |
Bayerized |
Bayerized w/AA filt. |
 |
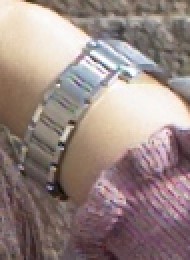 |
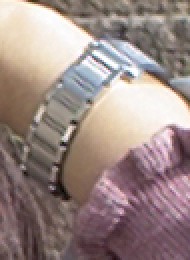 |
| Watch (200%) |
Bayerized |
Bayerized w/AA filt. |
 |
 |
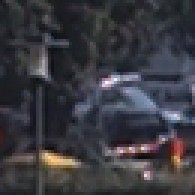 |
| Gate |
Bayerized |
Bayerized w/AA filt. |